Cars & dealerships
What Is Automotive Photography and How To Get Started Right Away?
What automotive photography actually covers, the four styles you will be asked for, and how to start today with the camera you already own.
Automotive photography is simply the photography of vehicles — but that covers everything from a phone snap of a Fiesta for a classified ad to a manufacturer’s campaign shot with a helicopter.
What links all of it is one awkward fact: a car is a mirror. Its whole surface reflects the world around it. That makes it different from photographing a person or a product, and it is the reason so many car photos come out looking wrong for no obvious reason.
This guide explains the field, then gets you shooting today.
Getting started this afternoon? Take one photo, then put it through the background remover. Seeing the vehicle isolated from its surroundings teaches you more about what went wrong than any checklist.
What are the main types of automotive photography?
Listing and inventory photography
The bread and butter. Photographing cars so they can be sold — for dealerships, auction sites, private sellers and rental fleets. It is high volume, it is repetitive, and it pays because it is repetitive.
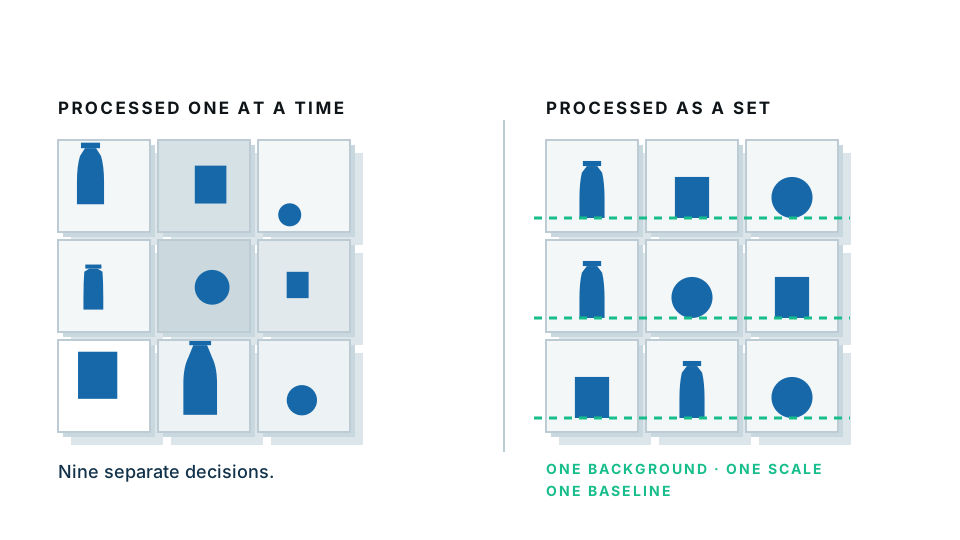
The skill here is not artistry. It is producing forty vehicles that all look like they were photographed in the same place on the same day.
Commercial and studio photography
Manufacturer marketing, brochures, showroom displays. Shot in a controlled space with large soft light sources, often composited afterwards. Expensive to produce and largely inaccessible to a beginner.
Rolling and action photography
The moving shots — a car panning past, or shot from a moving vehicle alongside. Dramatic, dependent on safety planning and a second driver, and a great portfolio piece rather than a way to start.
Detail and enthusiast photography
Badges, stitching, exhaust tips, engine bays, car meets. Low barrier to entry, good for practising light and composition, and popular on social media.
Most people who make a living from vehicles are doing the first one. If your goal is paid work rather than a portfolio, start there.
Why is photographing cars different from anything else?
Three reasons, and they explain most beginner mistakes.
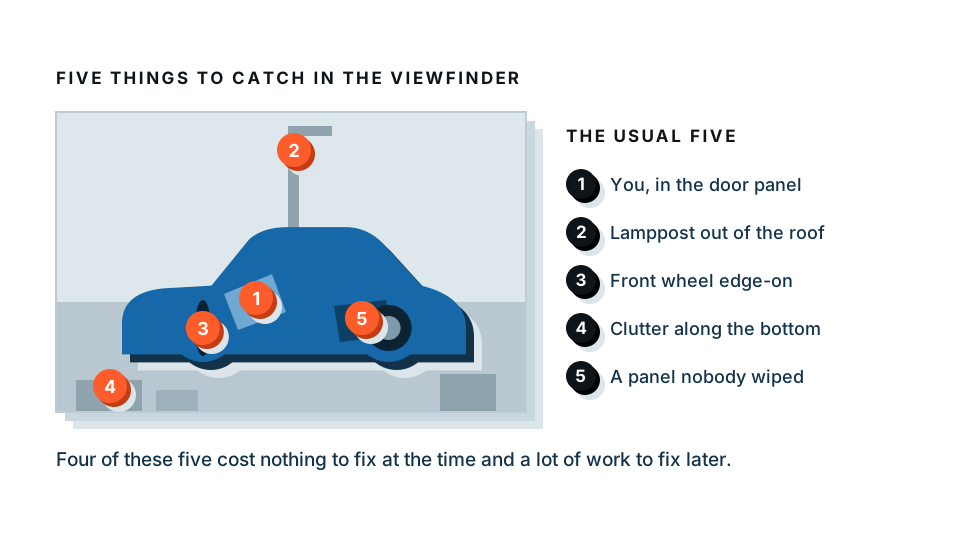
A car reflects its surroundings. The panels show you whatever is in front of them, including the photographer. This is why location choice matters more than any camera setting.
A car is long and low. Photographed from standing height it looks squat and dull. Photographed from headlight height it looks like the designer intended.
A car has huge tonal range. Bright sun produces a blown-out white bonnet and pitch-black shadow under the arches in the same frame. Flat cloud is genuinely the better light.
What equipment do you actually need?
| Kit | Do you need it to start? | What it buys you |
|---|---|---|
| A modern phone | You already have it | Everything you need for listing work |
| A short telephoto lens (50–105mm) | Not immediately | Correct proportions with no wide-angle bulge |
| A polarising filter | Nice to have | Cuts glare on glass and paint; the one filter worth owning |
| A tripod | Rarely | Only for low light or matched framing across many cars |
| A microfibre cloth and detail spray | Yes, day one | Cheaper and more effective than any accessory |
| A clean, open place to shoot | Yes, day one | Controls reflections, which nothing else does |
The last two matter more than the first four. Beginners buy lenses; professionals find better locations.
How do you get started today?
- Pick your spot. An open area with sky above and nothing tall nearby. An empty corner of a car park on a Sunday morning is ideal.
- Wait for cloud, or go early. Overcast is a giant softbox. Failing that, the first hour after sunrise or the last before sunset.
- Clean the car and your lens. Both. Dry the panels properly if it has been washed.
- Crouch to headlight height. This one change will improve your photos more than anything else on this list.
- Step back and zoom in slightly. Six to eight metres away with a little zoom, not two metres away with a wide lens.
- Shoot the front three-quarter first — front and one side visible, wheels turned slightly towards you.
- Walk a full circle, shooting at each quarter turn, keeping the same height throughout.
- Check your reflection in the nearest panel before every frame.
- Shoot the interior, the dash, the boot and the wheels.
- Review at full size before you leave. Reshoots are cheap while you are still standing there.
Once you have the shots: the background changer puts every vehicle onto the same backdrop, which is what turns a set of photos into a set that looks professional.
How do you finish the photos?
Editing car photos is mostly restraint. Straighten the horizon, correct the exposure, make the paint the colour the paint actually is, and stop.
The one substantial edit is the background. Replacing a cluttered forecourt with a clean neutral does three things: it removes distraction, it makes different vehicles comparable, and it hides the fact that your six cars were shot in six different places.
The shadow, honestly
You will meet this immediately, so it is worth knowing before you are confused by it.
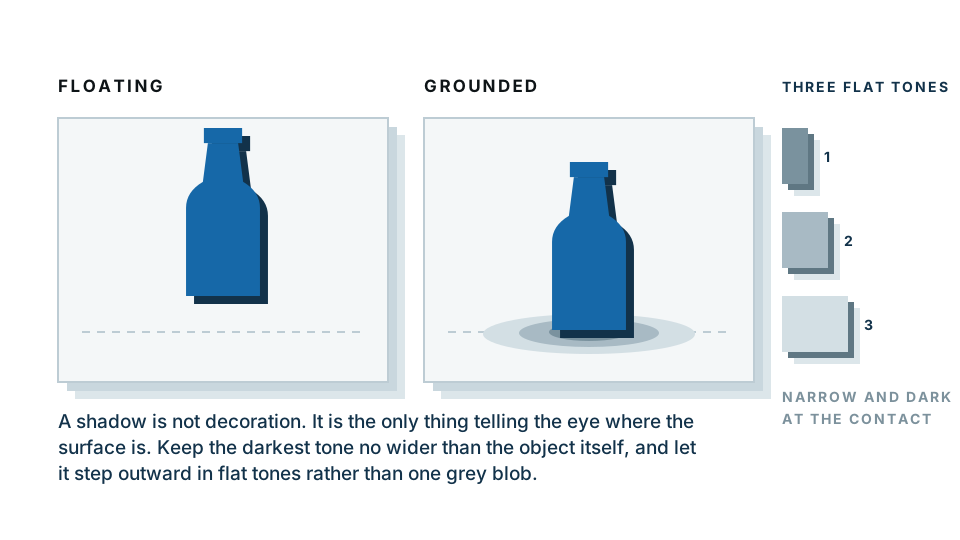
In a normal photograph the black of the tyre and the black of the shadow beneath it have been crushed to the same value. There is no visible boundary between them in the image data. That means no automatic tool can separate the cast shadow from the tyres — not because the software is weak, but because the information is not in the file.
The professional workflow is to cut along the base of the tyres and add a soft synthetic shadow in the new composition. It looks better than any rescued real shadow, and it has a practical advantage: it is the same on every car, so a vehicle shot in drizzle and one shot in sun end up matching perfectly.
What makes automotive photography paid work?
If you want to turn this into income, the honest picture is that dealerships and traders buy reliability, not flair. What they want is:
- Every vehicle shot the same way.
- A predictable turnaround.
- A consistent set of images that drops straight into their listings.
- No surprises.
Which means the most valuable thing you can build is not a portfolio of dramatic shots. It is a written standard — one angle, one height, one background, one output size, one shot list — that you can execute the same way on the hundredth car as the first.
A note on privacy
The free preview runs entirely inside your own browser, so the image is not uploaded to generate it. That is genuinely useful for client work, for pre-release stock, or for anything with a plate or a private address in shot. The paid full-resolution download is processed on our server, so that step does send the file.
Start with one car
You do not need a course, a studio or a new camera. You need an open space, a cloudy afternoon and a willingness to crouch.
When you have your first set, take them to the tools built for car dealerships and see what they look like on a clean, consistent background. That is usually the moment it clicks.
Frequently asked
What is automotive photography?
It is photographing vehicles — for sale listings, manufacturer marketing, magazines, enthusiast portfolios or motorsport. The common thread is that a car is a mirror, so the job is as much about controlling reflections as about the car itself.
Do I need an expensive camera for automotive photography?
No. A modern phone is enough to start. Location, camera height and light do far more for a car photo than the sensor does.
What lens is best for photographing cars?
Something in the short telephoto range — roughly 50mm to 105mm on a full-frame camera, or your phone's 2x or 3x setting. Wide lenses distort the nearest corner of the vehicle.
How do you make car photos look professional?
Shoot low, shoot from further back, shoot in flat light, and put every vehicle on the same clean background afterwards. Consistency reads as professional more than any single dramatic shot.
Can you make money from automotive photography?
Yes, most commonly by photographing stock for dealerships and private sellers. It is steady, repeatable work and it rewards a reliable process over artistic flair.