Cars & dealerships
5 Car Photography Tips You Don't Want to Overlook
Five details that quietly ruin car photos: your own reflection, the line behind the roof, the wheels, the missing shots, and the walk-around you skipped.
The basics of car photography are easy to find: get low, use soft light, shoot a three-quarter angle. Most people know them.
The photos still come out wrong. That is because the things that actually spoil a car photo are smaller and less obvious, and they are almost never mentioned. Here are five of them.
Before you start: if you already have photos you are unhappy with, run one through the background remover. Seeing the car isolated makes every one of these problems jump out.
1. You are in the photo
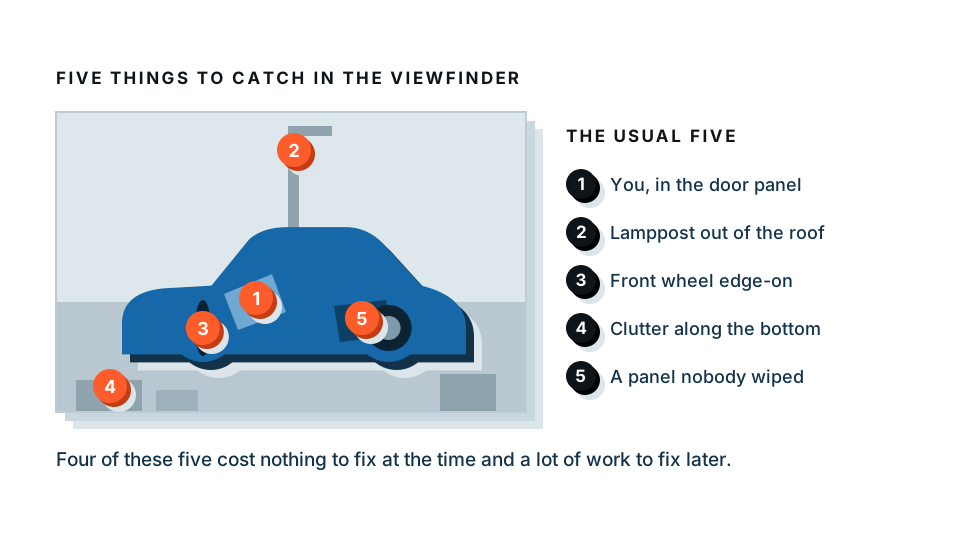
A car is a mirror on wheels. Every panel, every window and every strip of chrome reflects whatever is in front of it — and what is usually in front of it is you, crouched down holding a phone.
Look at the front door of any car you have photographed. You are almost certainly in it.
What to do about it:
- Move so the panel nearest you reflects open sky or clean ground, not a person.
- Shoot from slightly further back and zoom in a little. Distance shrinks your reflection.
- Wear something dark and plain when you are photographing light-coloured cars. A bright jacket is a bright smear in the paintwork.
- Check the door mirrors before you press the shutter. They catch you even when the panels do not.
This is worth repeating because it surprises people: replacing the background does not remove your reflection. The reflection lives in the paint, not the background. It is baked into the pixels of the car itself.
2. Look at the line behind the roof
Photographers call it a merge. A lamppost, a tree trunk, a fence post or a drainpipe lines up exactly with the roofline and appears to grow out of the car.
Once you notice it, you cannot unsee it, and buyers notice it too — not as “there is a pole” but as “this looks scruffy”.
The same applies to horizontal lines. A distant fence or the top of a hedge running straight through the middle of the car cuts the vehicle in half visually.
What to do about it:
- Before you shoot, look past the car at what is directly behind it.
- Take two steps left or right. That is usually all it takes.
- Shoot with more sky behind the roofline than clutter.
Even if you plan to replace the background entirely, a clean original makes a cleaner cutout. A cutout struggles most where the car edge sits against something the same tone as the car.
3. Sort the wheels out
The wheels are the first thing a buyer inspects and the last thing most sellers think about.
Turn the front wheels slightly towards the camera. Straight-on, an alloy is a thin edge. Turned a few degrees, you see the full face — the design, the finish, and whether the rim is kerbed.
While you are down there:
- Straighten the steering for the side profile shot so the car looks settled rather than mid-turn.
- Rotate the valve stems to the bottom if you are being fussy. It is a detail, but it is the sort of detail that reads as “cared for”.
- Wipe the alloys. Brake dust photographs darker than it looks in person.
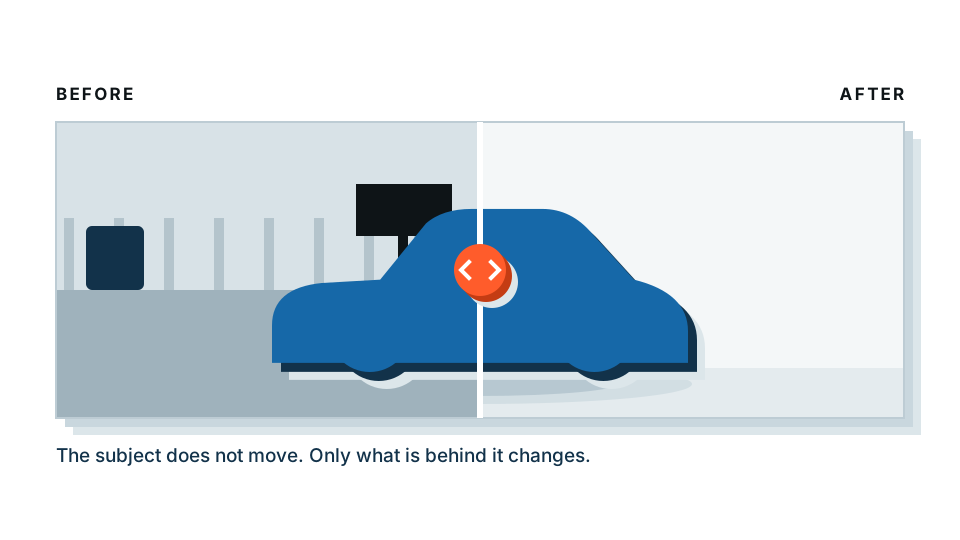
The wheel spokes are also the fiddliest part of any background cutout — those small gaps between the spokes are where automatic edges most often need a check. A clean, well-lit, turned wheel makes that job easier as well as looking better.
Halfway point: once your shots are in, the background changer is where you put every vehicle onto the same backdrop.
4. Photograph the things people will ask about
Every message you have to answer is a delay, and delays lose sales. Most of those messages are the same five questions.
| What buyers ask | The photo that answers it | Where people go wrong |
|---|---|---|
| “What’s the tyre tread like?” | A close-up across the tread of one front and one rear tyre | Skipped entirely |
| “Any damage?” | Clear, honest, close shots of every mark | Hidden, which causes disputes later |
| “What’s the mileage?” | The dashboard with the display lit | Shot at an angle, unreadable |
| “Is there service history?” | The book open, or the digital record on screen | Never photographed |
| “How big is the boot?” | Boot open, floor visible, parcel shelf in place | Shot with clutter still inside |
Photographing the flaws honestly feels counterintuitive when you are trying to sell something. It works in the opposite direction: it filters out the buyers who would have walked away in person, and it makes everything else you claim more believable.
5. Do the walk-around before you shoot, not after
The five minutes before you lift the camera save an hour afterwards.
Walk once around the car and deal with:
- Bins, cones, hoses, other cars — move them or move the car.
- Water spots. A car dried by the sun after a wash is covered in them. Dry the panels with a cloth.
- Floor mats and interior clutter. Old receipts and a child’s crisp packet appear in every interior shot.
- The number plate. Decide once whether you are showing it or covering it, and be consistent.
- Windows and mirrors. Smears are far more visible in a photo than in life.
- Your phone lens. It lives in a pocket. It is dirty.
None of this is photography. All of it changes the photo more than any setting you could adjust.
The one thing you will hit when you edit
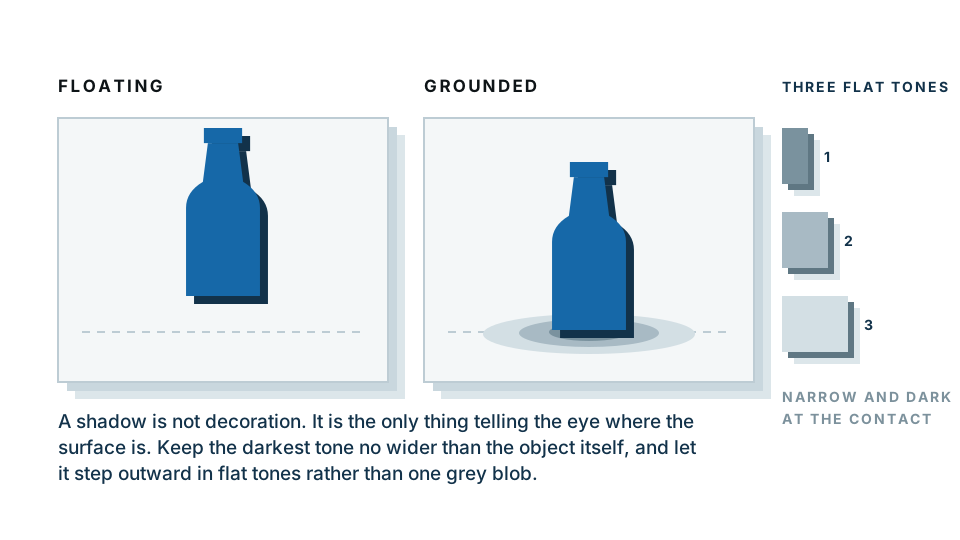
Worth flagging so it does not catch you out: the shadow under the car cannot be separated from the tyres automatically. In almost every photo, the dark rubber and the dark contact shadow have been crushed to the same near-black value, so there is no edge in the data for any tool to find.
The professional approach is to cut along the bottom of the tyres and add a clean synthetic shadow underneath in the new composition. It looks better than a salvaged real shadow, and — because it is identical every time — it makes a whole set of vehicles match.
A quick word on your files
The free preview runs entirely in your own browser, so the photo is not uploaded to produce it. Useful if the shot has your driveway, your plate or a car you have not listed yet in it. The paid full-resolution download is processed on our server, so that step does send the file — we would rather say so than let you guess.
Put them into practice
None of these five tips need equipment. They need thirty seconds of attention each, before the shutter, and they are the difference between photos that look snapped and photos that look arranged.
Ready to finish the job? Take your best shots to the tools built for car dealerships and get the whole set onto one clean background.
Frequently asked
Why can I see myself in the car photo?
Car paint and glass are mirrors. If you are standing in front of a reflective panel, you are in the shot. Move so the panel reflects sky or open ground instead of you.
Should the wheels be straight or turned in a car photo?
Turn the front wheels slightly towards the camera so you see the face of the alloy rather than its edge. It costs nothing and makes the photo look deliberate.
What car photos do buyers actually ask for?
Tyre tread, the boot floor, the service history, the mileage on the dash, and any damage. Photographing these upfront cuts the number of messages you have to answer.
Does the background matter if I am going to remove it anyway?
Yes. Removing the background does not remove what the paintwork reflected. A car shot between two vans has two vans in its doors, whatever you put behind it.
What is the most common mistake in car photography?
Shooting from standing height. It looks down on the vehicle and makes it appear short. Crouching to headlight height fixes it instantly and costs nothing.