General
Photo Studio Tips for Easy Background Removal
Shoot so the cutout is easy. Lighting, distance, backdrop colour and camera settings that make background removal fast instead of a retouching job.
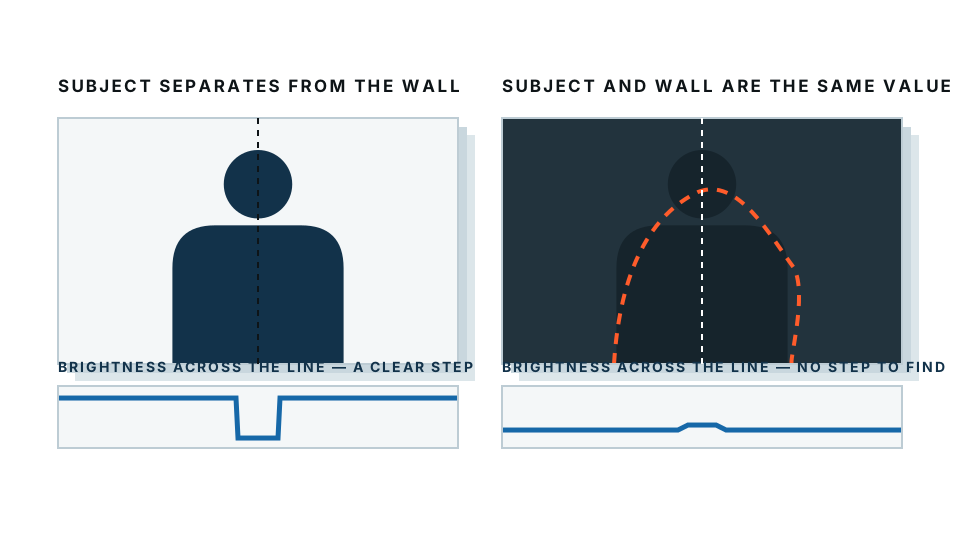
Every hard cutout was an easy cutout that got shot badly. Hair merging into a similar-coloured wall, a shadow that the software reads as part of the subject, a dark jumper against a dark backdrop — these are shooting problems that arrive disguised as editing problems.
Fix them at the camera and the removal step becomes a formality. This guide covers what to change in a home studio, a rented studio or a corner of a spare room.
Quick summary: separate your subject from the backdrop by a metre or two, light them separately, choose a backdrop colour that contrasts with the subject, and keep every frame consistent.
Shooting today and want to check your setup is working? Take one frame, run it through the background remover, and look at the edges. The free preview runs in your browser, so you can test a client’s shots without uploading anything.
The one rule that matters most: separation
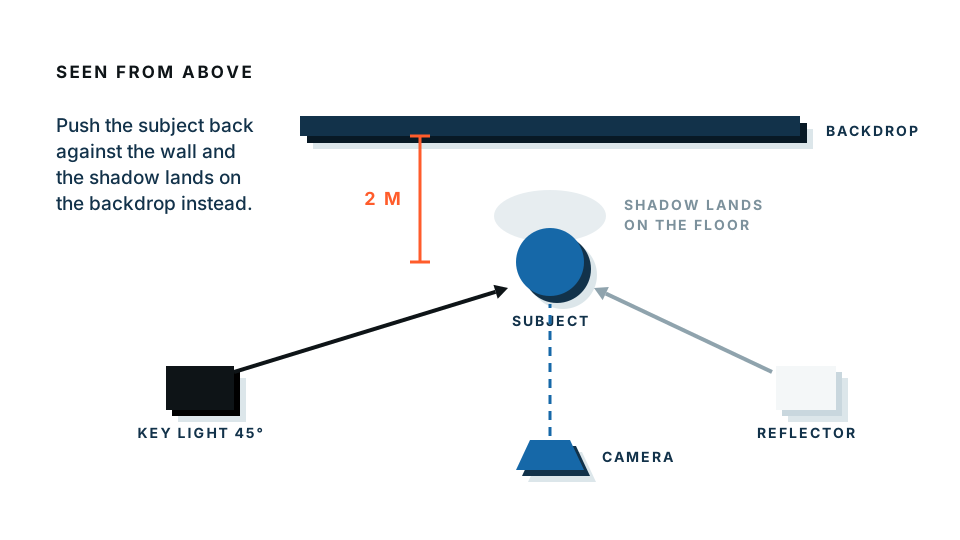
If you take one thing from this guide, take this. Put distance between your subject and the backdrop.
One to two metres is the target. Here is what that distance buys you:
- No shadow on the backdrop. A subject pressed against a wall casts a hard shadow onto it. That shadow has an edge, and edges are exactly what a cutout follows. Half your removal problems disappear with distance alone.
- Independent lighting. You can light the subject and the backdrop separately, which means you can make the backdrop brighter or darker than the subject on purpose.
- Natural falloff. Light falls off with distance, so a distant backdrop goes softer and more even without you doing anything.
If your room is small, this is still the first thing to fight for. Move the subject forward rather than the backdrop back.
Choosing a backdrop
What colour?
The answer is not “white”. The answer is “whatever contrasts most with today’s subject”.
| Subject | Best backdrop | Avoid |
|---|---|---|
| Dark clothing, dark hair | White or light grey | Black, dark blue |
| Light hair, white shirt | Mid-grey or a mid tone | White, cream |
| Shiny metal product | Mid-grey, non-reflective | White (blows out edges) |
| Glass or transparent items | Graduated grey, or lit from behind | Anything busy |
| Mixed range of products | Mid-grey | Anything that matches a product |
Mid-grey is the most useful single backdrop to own. It contrasts with both light and dark subjects, it does not throw colour onto anything, and it can be lit to read as anything from near-black to near-white.
What material?
- Paper roll — cleanest, no creases, cheap, tears eventually. The standard for a reason.
- Muslin or cotton — portable and forgiving, but creases show and creases create edges.
- Vinyl — wipes clean, good for products and food, slightly reflective.
- A plain painted wall — free and fine if it is genuinely flat and clean. Check for scuffs at floor level.
Whatever you use, keep it clean and keep it flat. Every crease, scuff and dust mark is something the cutout has to decide about.
Do you need a green screen?
Almost certainly not. Green screens exist because older keying methods needed one specific colour to key out. Modern background removal identifies the subject rather than the colour, so a clean grey works just as well.
Green also has a real drawback: colour spill. Green light bounces off the backdrop onto your subject’s hair, shoulders and the edges of pale clothing. You then spend the editing time you saved removing a green fringe.
Lighting for clean edges
The goal is not dramatic lighting. It is a clear, consistent edge all the way around your subject.
The three lights that matter
- Key light. Your main light, at roughly 45 degrees to the subject and slightly above eye level. Use a softbox or an umbrella — a bare bulb gives you a hard shadow edge.
- Fill. A second light or a simple white reflector on the opposite side, at lower power. This stops one side of your subject falling into darkness where no edge is visible.
- Background light. Aimed at the backdrop, not the subject. This is the one people skip, and it is the one that makes cutouts easy — it lets you make the backdrop clearly brighter or darker than the subject.
Rim light: the secret weapon
A light placed behind and to the side of your subject, aimed at their edge, creates a thin bright outline separating them from the backdrop. It is the difference between a cutout tool guessing where dark hair ends and a cutout tool being told.
Keep it subtle. A rim light strong enough to see clearly in the final image is usually stronger than you need.
Natural light, if that is what you have
You do not need studio lights. A large window on an overcast day is a beautiful soft source.
- Position the subject at 45 degrees to the window, not facing it directly.
- Use a white card or foam board on the opposite side as fill.
- Turn the ceiling lights off. Mixing daylight with tungsten or LED gives you two different colour temperatures in one frame, which shows up as a colour cast on one side.
- Shoot at the same time of day if you need consistency across a session.
Camera settings that make life easier
Shoot the largest, highest-quality file your camera offers. RAW if you have it, largest JPG if not. Cutout quality is limited by how much real edge detail exists in the file.
Keep the whole subject sharp. Depth of field — the range of distance that is in focus — should cover your entire subject. On a camera with manual control, that means a smaller aperture such as f/8 or f/11 for products. A blurred edge is an ambiguous edge.
Keep ISO low. Noise looks like texture, and texture near an edge confuses both software and eyes. Add light rather than raising ISO.
Lock your white balance. Auto white balance shifts between frames, which means a set of product photos that do not match. Set a custom or preset value and leave it.
Use a tripod for product work. Every frame lines up, which means you can batch-crop and batch-process the whole set identically.
Test one frame before you shoot the whole set. Drop it into the background remover and zoom into the edges — if hair or a product edge is ambiguous, fix the lighting now rather than in three hundred images later.
Subject-specific tips
People
- Tie long loose hair back if the shot allows. Flyaway strands are the single hardest thing to cut out.
- Avoid clothing that matches the backdrop tone.
- Watch for a dark shadow under the chin merging with a dark collar.
- Fine mesh, lace and sheer fabric will always need manual attention. Shoot them against maximum contrast.
Products
- Raise the product slightly on a small clear stand if you want a shadow that does not touch it.
- Shoot from the angle the customer will view it.
- Wipe fingerprints off anything glossy first. They become visible marks at full resolution.
- Shoot a colour reference card in the first frame so you can correct colour accurately later.
Reflective and transparent items
These are genuinely difficult, because what you see through or reflected in them is the background you are trying to remove.
- Light a transparent item from behind, against a white surface, so the edges read as dark lines.
- Use a tent or diffusion around a reflective item so it reflects even white rather than your room.
- Accept that these need manual work. Plan the time.
The consistency checklist for a batch
If you are shooting a set that must match — a product range, a team of staff, a catalogue — lock these down and do not touch them mid-session:
- Camera position and height
- Lens and zoom setting
- Aperture, shutter speed, ISO
- White balance
- Light positions and power
- Subject mark on the floor
Tape a mark on the floor. Photograph your settings screen. When someone knocks a light stand, you will know what to restore.
Quick diagnosis: why is this cutout hard?
| Symptom | Cause at the camera | Fix next time |
|---|---|---|
| Edge wanders into the subject | Low contrast with backdrop | Change backdrop colour or add a rim light |
| Hard line behind the subject | Shadow on backdrop | More distance from the backdrop |
| Fringe of backdrop colour on the subject | Colour spill | Move further from backdrop, avoid saturated colours |
| Soft, uncertain edges | Subject out of focus, or camera shake | Smaller aperture, tripod, more light |
| Speckled, noisy edges | High ISO | Add light, lower ISO |
| Images in a set do not match | Auto white balance or moved lights | Lock settings, mark positions |
The five-minute setup
If you take nothing else from this: mid-grey backdrop, subject two metres in front of it, one soft light at 45 degrees, a white card as fill, a light on the backdrop, and locked camera settings. That covers most subjects most of the time, and turns background removal into a click rather than a task.
Test your setup with one frame before you shoot the whole session. It takes seconds, the preview is free, and it happens entirely on your own machine.
Frequently asked
What backdrop colour is best for background removal?
One that contrasts strongly with your subject. Mid-grey is the most versatile because it differs from both light and dark subjects. Pure white works well for dark products but hides light-coloured edges.
How far should a subject stand from the backdrop?
At least one to two metres. Distance is what stops shadows falling on the backdrop and lets you light the subject and the background separately.
Do I need a green screen?
No. Green screens help video and older keying methods. Modern background removal works from any clean, evenly lit backdrop, and green can spill colour onto your subject.
What camera settings make cutouts easier?
Shoot in the highest quality your camera offers, keep the subject sharp with a small aperture, use a low ISO to avoid noise, and lock your white balance so every frame matches.
Can I fix a bad backdrop in editing instead?
Sometimes, but a shadow on the backdrop or a subject that matches the background in colour costs far more time to fix than it costs to shoot properly.