General
Automatically Remove Backgrounds in Dropbox, Shopify and More
How to design an automated background removal workflow: triggers, watched folders, storefront rules, and the standard to set before you automate.
If you have four images, background removal is a task. If you have four hundred, it is a logistics problem — and the cutout is the easy part.
This guide is about designing the workflow rather than clicking through it.
Quick summary:
- The cost at volume is the handling, not the editing.
- Every pipeline is the same three parts: a trigger, a transform, a destination.
- Set the standard before you automate. This is the whole argument of the article.
- Never overwrite originals. Keep them forever.
- Budget for a short human QA pass on the categories that reliably fail.
Selling physical products? Our product photography tool is built around exactly this problem — consistent cutouts across a catalogue, not one hero shot.
Why automation matters once you have volume
Removing one background takes seconds. Doing it four hundred times takes far longer than four hundred times as long, because the editing was never the expensive bit. The expensive bits are:
- Renaming.
IMG_4471.jpghas to become something your store understands. - Resizing. Every image needs the same pixel dimensions or the grid looks broken.
- Re-uploading. Manually, one at a time, into a web form.
- Remembering. Which of the 400 did you already do? Which did you redo after the lighting change? This is the one that ruins afternoons.
Automation is worth building not because it removes backgrounds faster, but because it removes the bookkeeping.
What an automated image pipeline actually is
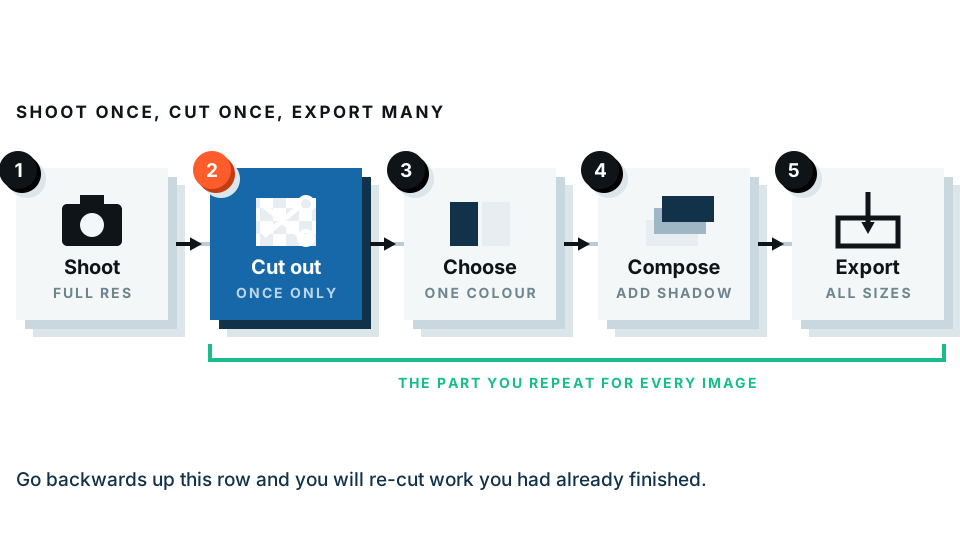
Strip away the tooling and every image workflow has three parts.
1. The trigger. An event you have agreed to react to. A file lands in a watched folder. A new product record is created in your store. Someone drops a card’s worth of photos into a shared directory.
2. The transform. What happens to the image: the cutout, plus everything that travels with it — the background behind the subject, the canvas size, the padding, the file format, the new filename.
3. The destination. Where the finished file goes. A storefront product image slot, a CMS media library, a shared drive folder.
Naming these three out loud is most of the design work. When something goes wrong later, the fault is almost always in a part you never explicitly decided.
Set the standard before you automate anything
This is the part people skip, and it is the part that matters.
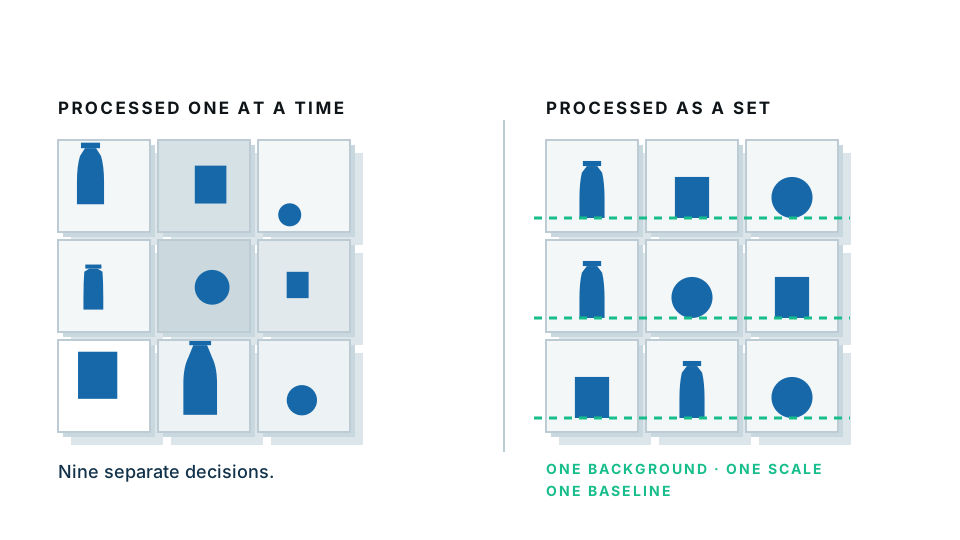
An automated pipeline does not improve your images. It applies your decisions faster. If your decisions are inconsistent, you now produce inconsistency at scale — and it is harder to spot, because nobody is looking at each file any more.
Write the standard down first. Four decisions:
- One output size. Pick the pixel dimensions and stick to them. Square is the safest default for a product grid.
- One background. Transparent, or one specific white, or one specific brand colour. “Whatever looks nice” is not a standard.
- One file format. PNG if you need transparency, JPG or WebP if you do not. Mixing formats causes file-size and quality differences that show up in a grid.
- One naming convention. Something like
sku-angle-variant.jpg— readable by a human, sortable by a machine.
Add a fifth if you can: one subject size within the frame. Deciding the product occupies roughly 85% of the canvas width, with even padding, is what makes a row of thumbnails look like a catalogue rather than a pile of photos.
Once that document exists, automation is straightforward. Until it does, automation is a way to make a mess consistently.
Watched-folder patterns with cloud storage
The most robust pattern for teams without engineers is a three-folder setup on whatever cloud drive you already use.
/originals— every file straight off the camera or phone, untouched, forever./to-process— copies of the files that need work./done— finished, renamed, correctly-sized output.
Three rules make it work.
Never overwrite an original. The cutout is a derived file. Originals are the source of truth.
Keep the originals forever. Your standard will change — white to transparent, 1200px to 2000px, padding too tight. The only thing that lets you redo the whole catalogue in an afternoon is every untouched original still sitting there. Storage is cheap; a reshoot is not.
Move files between folders, don’t copy and hope. A file that has left /to-process is done. That one rule replaces the entire “which ones did I already do” problem.
Put a plain text file in the root of the tree with the standard written in it.
Working with client images or unreleased products? The free preview in our background remover runs entirely in your browser — the image is not uploaded — while the paid full-resolution download is processed on our server. If confidentiality matters, that split is worth planning around.
What storefronts actually want from a product image
E-commerce platforms are less prescriptive than people assume, but shoppers are not. Four things matter for the main image:
- A clean background. Usually plain white or transparent, so it sits on any page background. A busy main image is the fastest way to look unprofessional in a grid.
- Consistent framing. The product at roughly the same size in frame across every listing.
- A consistent aspect ratio. Square survives every grid, thumbnail and mobile layout without awkward cropping.
- Enough resolution to zoom. Shoppers zoom, and an image that turns to mush at 200% costs sales.
Treat lifestyle images differently. The main image sells clarity; lifestyle images sell context. A photo of the product on a kitchen counter should keep its background — that background is the point. Do not run the lifestyle set through the same pipeline. Put it in a different folder before anything touches it.
Where a human still has to look
Automatic cutouts are good, but not uniformly good — and the failures are predictable, so you can plan for them.
Build in a quick QA pass: open /done as a thumbnail grid and scan it. Bad cutouts announce themselves at thumbnail size — a halo, a missing handle, a chunk taken out of the product. Two minutes over a grid of a hundred catches nearly everything.
The categories that reliably fail:
- Glass and anything transparent. The tool has to decide what a see-through pixel should be, and that is a judgement call.
- Chrome and polished metal. Reflections contain the background, so the cutout removes part of the product.
- Wispy hair and fur. Fine strands against a similar tone are the classic hard case.
- White on white. A white product on a white background has almost no edge to find.
- Wires, straps, handles and thin gaps. Cables, bag straps, the space inside a mug handle. Thin features get swallowed.
Send those to a manual pass. If a whole product category falls into one of these buckets, the real fix is upstream: shoot it against a contrasting background so there is an edge to find.
The realistic middle path if you have no engineering help
Most people reading this have no developer, and waiting for a perfect pipeline means doing nothing for months. There is a good middle option: batch through the browser in sittings of 20 to 30 images.
- Write the standard down first. All four decisions, in a text file.
- Copy 20–30 originals into
/to-process. Never the whole set. - Run them through with the same size and background settings every time.
- Rename to your convention as you save, not later.
- Move the finished files to
/doneand the sources out of/to-process. - Scan the batch as a thumbnail grid before starting the next one.
Twenty to thirty is the right size: small enough to stay accurate and for a mistake to cost one sitting rather than a week, big enough to finish a real chunk of work. Six sittings clears 150 images at a consistency most automated pipelines would be pleased with.
Workflow stages at a glance
| Workflow stage | What to standardise | What breaks if you don’t |
|---|---|---|
| Capture / intake | Shooting background, lighting, one folder for originals | Cutouts fail unpredictably; no clean source to redo from |
| Trigger | Which folder or event starts the work | Files get processed twice, or never |
| Cutout | Subject-in-frame size, padding, edge handling | Products appear at different scales in the grid |
| Background & format | One transparent or one exact colour; one format | Visible mismatch between listings |
| Sizing | Exact pixel dimensions and aspect ratio | Broken grid layouts and soft zoom views |
| Naming | One filename pattern, applied at save time | Nobody can find anything; duplicate uploads |
| Destination | Which slot, which library, which folder | Lifestyle shots land in main image slots |
| QA & archive | Who checks; originals kept untouched, forever | Halos reach customers; a standard change means a reshoot |
Start with one batch
You do not need a pipeline to get the benefit — you need a standard, a folder structure, and the discipline to apply the same settings every time.
Write your four decisions down, then run your first 25 through the background remover and see how much of the catalogue that clears in one sitting.
Frequently asked
What do I need before I automate background removal?
A written standard: one output size, one background colour, one file format and one naming convention. Automating an inconsistent standard just produces inconsistency faster.
Should automated cutouts overwrite the original file?
Never. Keep the untouched original forever in a separate folder. When your standard changes — and it will — the original is the only thing that lets you redo the whole catalogue.
Which product images still need a human to look at them?
Glass, chrome and other reflective surfaces, wispy hair, white products on white backgrounds, and anything with a thin wire, strap or handle. Those are the reliable failure categories.
What does an e-commerce platform want from a main product image?
Consistent framing, a clean uncluttered background, a consistent aspect ratio — square is the safe choice — and enough resolution that the zoom view stays sharp.
What if I have volume but no engineering help?
Batch through a browser tool in sittings of 20 to 30 images with a strict naming convention. That captures most of the benefit of automation without any pipeline to build.