Product photography
6 Tips On How To Take Good Pictures Of Clothes To Sell
Six practical tips for photographing clothes at home so they sell faster: window light, flat-lay or hanger, true colour, honest flaws, one background.

You have a pile of clothes to list on Vinted, Depop, eBay, Etsy or your own store, no studio, and a limited amount of patience. The photos are what decides whether anyone taps through. They are also the part most sellers rush.
The good news: none of this needs equipment. It needs a window, a clean surface and a routine you can repeat forty times without thinking. Here are the six things that move items.
Put your listings on a clean white background free → The preview runs entirely in your browser, so nothing is uploaded.
1. Shoot in daylight near a window, with the room lights off
Household bulbs are yellow. Your phone tries to correct for them and usually overcorrects, which is why so many secondhand listings look either jaundiced or oddly blue. Flash is worse: it flattens the fabric, blows out anything shiny, and casts a hard shadow behind the garment.
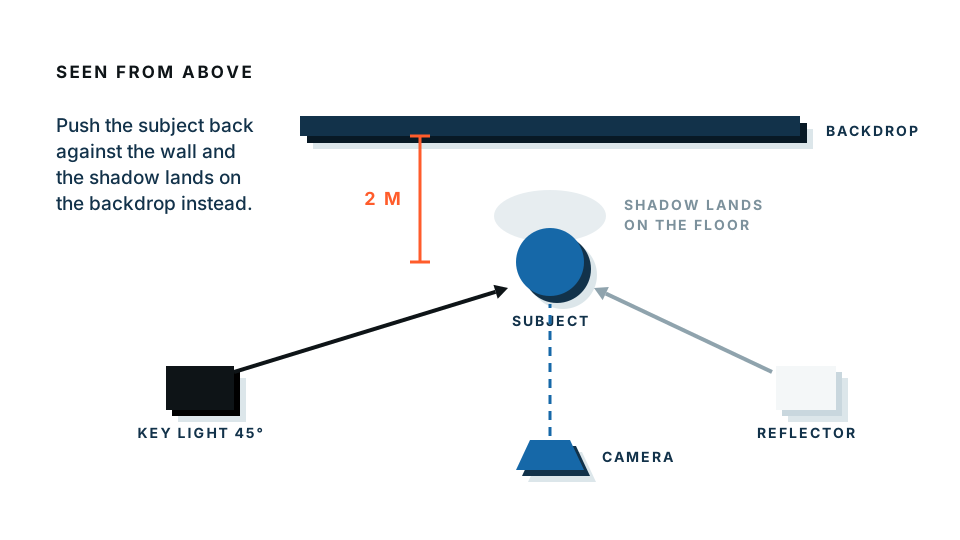
Do this instead. Find a window. Lay the item on the floor or a table beside it, roughly a metre away, so the light comes in from the side rather than straight down. Turn every lamp and ceiling light in the room off, so daylight is the only light source. Overcast days are ideal — direct sun creates a harsh edge and a black shadow.
If one side of the garment falls into shadow, prop a sheet of white card or an ironing board cover on the dark side to bounce light back. That is a reflector, and it costs nothing.
2. Choose flat, hanger, mannequin or model on purpose
Each method answers a different question for the buyer.
- Flat lay shows true shape and colour. Best for tees, knitwear, folded jeans, kidswear and anything you have a lot of. It is also by far the fastest — you can do twenty items in an hour.
- Hanger shows how something falls. Good for shirts, blouses and light jackets. Hang it on a hook against a plain wall, not held up in your hand in a doorway.
- Mannequin gives shape without a person. Worth buying if you sell regularly; a cheap torso form pays for itself.
- On a model answers the question buyers actually have, which is “what will this look like on a body”. Best for dresses, coats and tailoring, where drape is the whole product.
Most good listings use two: a flat or hanger shot for the truth of the item, plus one worn shot for the feel of it.
Which surface or background should you use?
| Setup | Surface or backdrop | Cost | Best for | Watch out for |
|---|---|---|---|---|
| Flat lay | White bedsheet, ironed, on the floor | Almost nothing | Tees, knitwear, kidswear, bulk listing | Creases in the sheet, shadows from you leaning over |
| Flat lay | Large sheet of white or grey card | Low | Small items, accessories, shoes | Card is too small for coats; it dents and curls |
| Flat lay | Bare wooden floor | Free | A styled, editorial look | Wood colour tints the garment; hard to keep consistent |
| Hanging | Plain painted wall | Free | Shirts, dresses, jackets | Skirting boards, light switches, shadow behind the garment |
| Hanging | Fabric or paper backdrop on a rail | Medium | Regular sellers, matching sets | Needs space you may not have |
| Any | Shoot as-is, replace the background after | Low | Mixed piles shot in different rooms | Fine lace and mesh need a careful check |
3. Steam or shake the item out first
A wrinkled garment reads as unloved, and buyers price it that way. This is the highest-return two minutes in the whole process.
A handheld steamer is the fast option. Failing that, hang the item in the bathroom while you shower, or shake it out hard and smooth it flat with your palms as you lay it down. For flat lays, take an extra ten seconds to square the shoulders, straighten the sleeves and make both sides symmetrical. The eye notices symmetry before it notices anything else.
Do the same for shoes: wipe the uppers, straighten the tongue, and tuck the laces.
4. Get the colour right, then check it against the real thing
Colour is the number one cause of “not as described” messages. Your camera does not know what colour the light is; it guesses. Put a garment on a wooden floor under a warm bulb and a grey jumper photographs as beige.
Three habits fix most of it:
- Shoot on a neutral surface. White, light grey or black. Strongly coloured sheets and walls bounce their own colour onto the fabric.
- Compare before you post. Hold the actual garment next to your phone screen in daylight. If the photo is warmer or cooler than the real item, adjust the warmth slider in your phone’s editor until they match.
- Say so in the description for anything genuinely hard to capture. Deep blacks, burgundies and rich navies photograph unreliably. A line saying “true colour is closer to the third photo” saves an argument later.
Resist heavy filters. A filtered photo that flatters the item is a refund waiting to happen.
Try the white background maker on one listing → and see how much cleaner the item reads against plain white.
5. Photograph the flaws honestly
This feels like it will cost you sales. It does the opposite.
Photograph every stain, hole, pull, bobble, stretched cuff, missing button, worn sole and faded print — close up, in focus, in the same daylight as the rest of the shots. Describe each one in the listing text as well.
Two reasons. First, it kills returns and disputes almost entirely, because a buyer cannot claim they were not told about something you photographed. On platforms where an item-not-as-described case counts against your account, that protection is worth real money. Second, honest flaw photos make buyers trust the rest of your listing. A seller who shows a small mark on the hem is clearly not hiding anything bigger.
Include a shot of the care label with the size and fabric composition too. It heads off half the questions in your inbox.
6. Use the same background on every single listing
This is the tip that separates people who shift their pile from people whose pile just sits there.
One clever photo does very little. What sells a wardrobe of forty items is consistency. When a buyer lands on your profile, they see a grid of thumbnails all at once. If those thumbnails share one clean background, the grid reads as a shop. If every item sits on a different carpet, bed, kitchen table and hallway floor, it reads as a car boot sale — even when each individual photo is perfectly sharp.
You have two routes to that consistency:
- Shoot everything in one place. Same sheet, same window, same time of day. This works well until the weather changes, you move house, or you list something too large for your setup.
- Shoot wherever you can, then standardise afterwards. Take the photos in whatever room the item ends up in, then cut out the garment and drop it onto the same neutral background every time. This is far more realistic for most sellers, and it means a jumper shot in January matches one shot in June.
Plain white is the safe default. Most marketplaces expect it, and it makes colour easy to judge. A very light grey is a good alternative if your items are mostly white or cream, so the edges do not disappear.
One honest limitation: automatic cutouts find lace, mesh, chiffon and loose knit harder than solid fabric, because there is background showing through the garment itself. Shooting those items against a surface clearly different in tone from the fabric — dark lace on a pale sheet, a white blouse on mid-grey — gives any tool far more to work with. Always glance at the edges before you post.
Your repeatable routine
Once it works, do the same thing every time:
- Steam or shake out the item.
- Lay it on the neutral surface by the window, lights off.
- Shoot front, back, fabric close-up, label, and every flaw.
- Check the colour against the real garment.
- Standardise the background so the whole grid matches.
Five minutes an item, and your listings start looking like a shop.
Frequently asked
What is the best lighting for photographing clothes at home?
Indirect daylight from a window, with the room's own lights switched off. It shows fabric texture and true colour without the yellow cast of household bulbs or the flat glare of a flash.
Should you photograph clothes flat or on a hanger?
Flat for knitwear, tees, folded trousers and anything you want to show the true shape of. On a hanger or a model for dresses, coats, tailoring and anything whose drape is the selling point. Most sellers use both across a listing.
Do you have to photograph flaws when selling clothes?
Yes, if you want to avoid returns and disputes. A clear close-up of a small stain or some bobbling costs you very little and protects you completely. Buyers forgive a flaw they were shown and punish one they were not.
How many photos should a clothing listing have?
Four to eight. A full front, a full back, a close-up of the fabric, a shot of the label with the size, and one photo of each flaw. Add a worn shot if the fit matters.
Why do my clothing photos look yellow or grey?
Your camera is guessing the colour of the light and getting it wrong, usually because of room bulbs or a strongly coloured wall. Shoot in daylight, on a neutral surface, and compare the photo against the real garment before you post.