Product photography
Background Remover for Shopify and eBay Listings
How to get clean white product backgrounds that meet Shopify and eBay image standards, with the exact sizes, formats and workflow for both platforms.
Two things sell a listing before anyone reads a word: the price and the photo. And the photo is doing more work than you think, because a clean, consistent image reads as “real business” and a cluttered one reads as “person selling from their kitchen”.
Fixing this does not require a studio. It requires removing whatever is behind your product and replacing it with plain white. Here is the whole workflow for both platforms.
Put a product on a clean white background →
Why does the background matter so much?
Three concrete reasons, none of them aesthetic.
Platform rules. eBay’s image standards require a clear, uncluttered background on the main gallery photo, and discourage borders, watermarks and added text. Listings that break these rules can be excluded from certain search placements.
Search and ads. Google Shopping and most marketplace ad formats prefer a plain background. A busy photo can be rejected from a feed you did not know you were in.
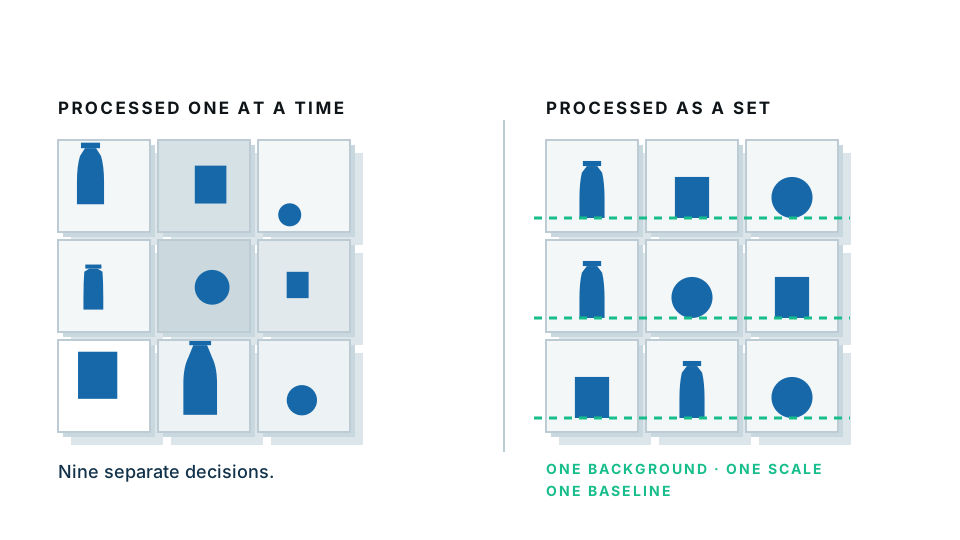
Trust. A row of thumbnails in identical white is instantly readable. A row of mixed backgrounds looks like a jumble sale. Buyers scan, and consistency is what makes scanning easy.
How do I photograph a product for a white background?
The background removal is easy. Getting a photo that cuts cleanly is where the effort belongs. Five minutes of setup saves an hour of fixing.
The window method
- Find a window. North-facing is ideal — soft light, no hard shadows. Turn the room lights off so you are not mixing warm bulbs with daylight.
- Put a sheet of white card on a table near the window, curving up against the wall behind so there is no hard corner line.
- Place the product a hand’s width from the back of the card.
- Put something white on the shadow side — a second card, a sheet of paper — to bounce light back and soften the dark side.
- Shoot from slightly above eye level of the product, not from directly overhead unless it is flat.
The five rules that make a cutout clean
- Contrast the background against the product. A white shoe on white card is genuinely difficult. Use light grey card for white products.
- Avoid clutter directly behind the product. Anything touching the outline confuses the cut.
- Keep it in focus. Soft edges cut softly.
- No harsh shadows falling behind the product. They read as part of the subject.
- Leave margin. Do not crop tight in camera. You want room to crop later.
Removing the background
This part takes seconds.
- Open the white background maker.
- Drop your photo in.
- The product is separated from the background automatically and placed on white.
- Check the edges — particularly handles, straps, and anything transparent.
- Download.
Our free preview runs entirely inside your browser. For a store owner photographing products that have not launched yet, that matters: the image is never uploaded anywhere during the preview.
If you want the product on a transparent background instead — so you can drop it into a banner, a lifestyle scene, or a coloured tile — use the transparent background maker and save a PNG master.
Shopify: sizes, formats and setup
What image size does Shopify need?
| Setting | Recommendation | Why |
|---|---|---|
| Dimensions | 2048 × 2048 px, square | Enables Shopify’s zoom on product pages |
| Format | JPG for listings, PNG for masters | JPG loads faster; PNG keeps transparency |
| Max file size | Under 20 MB (aim for under 500 KB) | Page speed affects conversion and ranking |
| Aspect ratio | The same for every product | Prevents thumbnails jumping around in the grid |
| Background | Pure white (#FFFFFF) or your brand’s off-white | Consistency across the catalogue |
The bit people forget: alt text
Every Shopify product image has an alt text field. Fill it in. Write what the photo shows — “navy canvas backpack, front view, brown leather straps” — not a keyword pile. It helps image search and it is a genuine accessibility requirement.
Keep the crop margin identical
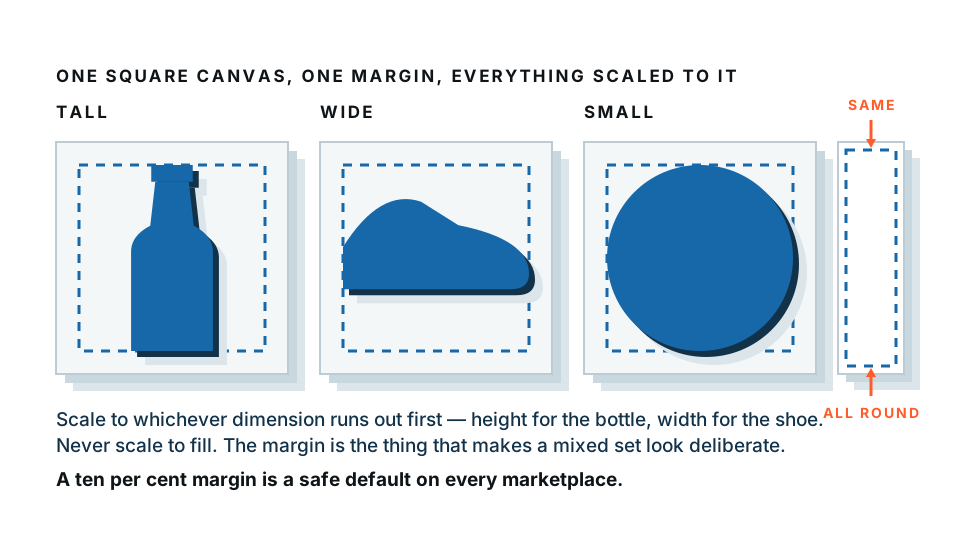
Shopify grids place products next to each other. If one product fills 90% of its frame and the next fills 50%, the grid looks broken even though both images are fine on their own. Pick a margin — say 10% around the product — and apply it to everything.
eBay: what the rules actually say
eBay is stricter than most sellers realise.
- Minimum 500 pixels on the longest side. Aim for 1600 px so the zoom works.
- Main photo needs a clear, uncluttered background. White or very light grey.
- No added borders, text or watermarks on the gallery image.
- No stock photos for used items — buyers want the actual item.
- Up to 24 photos per listing, free. Use them.
The listing photo set that sells
Do the main white-background shot first, then add context:
- Main: product on white, full item, centred.
- Angles: three or four more on white — back, side, detail.
- Scale: the item next to something recognisable.
- Flaws: if used, photograph the wear honestly. It reduces returns and disputes more than any description does.
- In use: one lifestyle shot, at the end.
Only the first needs to be perfect. The rest need to be honest.
Doing a whole catalogue without losing your mind
If you have more than about twenty items, work in batches:
- Shoot everything in one session with the setup untouched. Same distance, same light, same card.
- Rename files by SKU before editing. Not after.
- Run the whole folder through background removal in one pass.
- Crop to the same square canvas with the same margin.
- Export twice: PNG masters with transparency into an archive folder, JPGs on white into an upload folder.
That PNG archive is the part people skip and later regret. With transparent masters you can rebuild every listing image on a new background — a seasonal colour, a banner, an ad format — without reshooting a single product.
Build your transparent PNG masters →
Common problems and quick fixes
White product disappearing into white background. Shoot on light grey or pale blue card instead, then swap to white afterwards.
Faint grey halo around the item. The cut was slightly loose. Re-run it, or use the refine brush to tighten the edge.
Shiny or reflective products. Reflections show the room. Get further away, zoom in, and shoot from a lower angle so the camera sees less of your ceiling.
Transparent items — glass, bottles, acrylic. Shoot against a light background and expect to do some manual refinement. These are the hardest case for any tool.
Jewellery and thin chains. Shoot much closer than feels natural and light from the side. Fine chains need pixel width to survive a cutout.
Do this today
Pick your five worst-performing listings. Reshoot them near a window, put them on white, and reupload. Give it two weeks and compare click-through. It is the cheapest experiment in e-commerce.
Frequently asked
Does eBay require a white background?
eBay requires the main gallery photo to have a clear, uncluttered background and recommends white or very light grey. Photos with borders, added text or watermarks can be rejected from certain placements.
What size should Shopify product images be?
Shopify recommends square images at 2048 by 2048 pixels for its zoom feature. Anything smaller will still upload but will not zoom crisply.
Should I use PNG or JPG for product listings?
JPG for the final listing image once the white background is applied — smaller files load faster. Keep a PNG master with transparency so you can re-place the product on any background later.
Can I do a whole catalogue at once?
Yes, with batch processing. Shoot every item the same way, then run the folder through in one pass so the whole catalogue looks consistent.
Is it safe to upload photos of products I have not launched yet?
With our free preview, the image never leaves your browser, so unreleased products stay on your machine. Check the privacy policy of any tool before uploading pre-launch photography.