General
How to Remove Image Backgrounds in 5 Easy Ways
Five ways to remove an image background — online tools, your phone, software you own, manual editing, batch — compared on speed, cost and edges.
There are five practical routes to a cutout, and the right one depends almost entirely on how many images you have and how difficult the edges are.
Quick summary:
- One photo, normal edges — use an online tool. Seconds, no install.
- Photo already on your phone — press and hold the subject. Free and instant.
- No new software allowed — PowerPoint, Keynote and Preview can all do it.
- Glass, smoke, motion blur, flyaway hair — do it by hand in a full editor.
- Hundreds of files — batch or script it.
If you just want the job done and you are on one image, our background remover handles the cutout automatically, and the free preview runs entirely inside your browser — the picture never leaves your computer.
1. Use an online background remover
What it is: a website that detects your subject automatically and returns it on a transparent or replaced background. Nothing to install and nothing to learn.
The steps:
- Open the tool in your browser.
- Drag your image onto the page, or click to pick a file.
- Wait a few seconds for the automatic cutout.
- Choose transparent, a solid colour, or a replacement background.
- Download the result — PNG if you need transparency.
Good at: almost every ordinary photo. People, products, pets, cars — anything with a subject that stands clearly apart from what is behind it. It is the best speed-to-quality trade in the list.
Falls down when: the subject and background are the same colour or brightness (a white mug on a white table), or when the edge is genuinely ambiguous — glass, smoke, hair against a busy background. You also get less control than a manual editor: you can accept or reject the cutout, but you cannot nudge an individual edge pixel.
One privacy note. With our tool the free preview is computed in your browser, so an unreleased product shot or a personal photo never gets uploaded. The paid full-resolution download is processed on our server — better to say that plainly than imply otherwise.
2. Use the background removal built into your phone
What it is: recent iPhones and recent Android phones can isolate the subject of a photo straight from the photo viewer. No app, no account.
The steps on iPhone:
- Open the photo in Photos.
- Press and hold on the subject until it lifts away with a shimmer.
- Tap Copy or Share.
- Paste it into Messages, Notes, or save it as a sticker.
On Android: recent Pixel and Galaxy phones do the same — long-press the subject in the gallery, then copy or share. The exact wording varies by phone maker and version, so look for “copy subject”, “cut out”, or a sticker option.
Good at: speed. A two-second job, free, and the subject detection is surprisingly capable on people and pets.
Falls down when: you need control or volume. No edge refinement, no feathering, no way to fix a bad selection, no background colour choice, and no doing two photos at once. The file you get out is optimised for pasting into a chat, not for a product listing.
3. Use the tools already inside software you own
What it is: several everyday programs have background removal built in and most people never find it.
- PowerPoint has a Remove Background button on the Picture Format ribbon once an image is selected. It shows the cutout in magenta and gives you two brushes — mark areas to keep, mark areas to remove.
- Word has the same feature, and Keynote and Pages have an Instant Alpha tool that removes colours you drag across.
- Preview on Mac has an alpha-style selection in its markup toolbar, and recent versions can lift the subject automatically.
The steps in broad terms:
- Insert or open the image and select it.
- Find the picture or format tools.
- Choose the background removal or instant alpha option.
- Brush or drag to correct what the tool got wrong.
- Export — and check the format keeps transparency.
The exact menu wording varies by version and operating system, so hunt around the picture formatting tools rather than following a menu path to the letter.
Good at: locked-down laptops where you cannot install anything, and images that only ever live inside that same document or deck.
Falls down when: you need the cutout as a file. Getting a proper transparent PNG back out of a presentation program is fiddly, edge quality is average, and the brushes are blunt instruments next to a real mask.
4. Select it manually in a full editor
What it is: doing the work yourself in Photoshop, Affinity Photo or GIMP, using either a pen/path tool to trace hard edges or a layer mask you paint by hand.
The steps in broad terms:
- Open the image and duplicate the background layer.
- For hard, geometric edges, trace the subject with the pen or path tool, then convert the path to a selection.
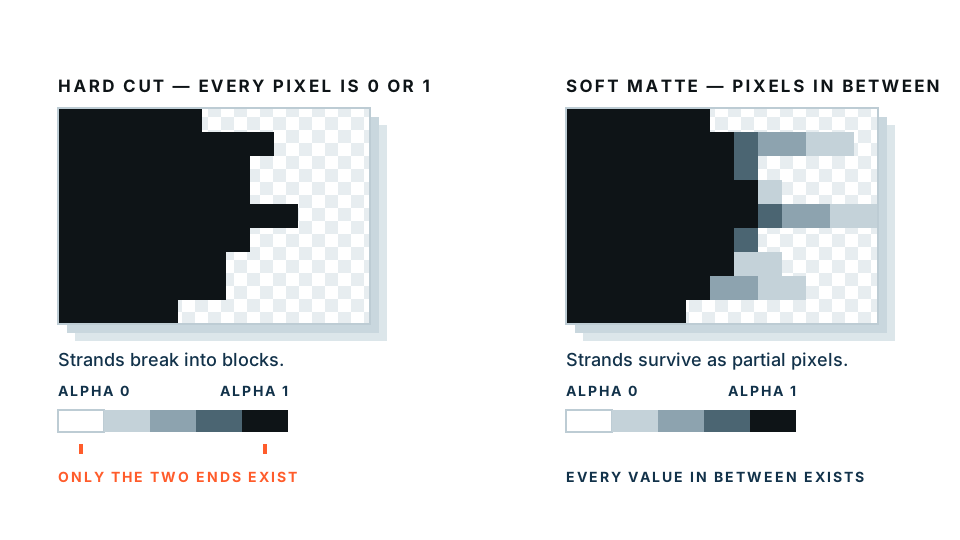
- For soft or complicated edges, add a layer mask — a greyscale overlay where white keeps a pixel and black hides it — and paint it with a soft brush.
- Refine: feather slightly, check the edge at 200% zoom, look for a fringe of old background colour.
- Export as PNG or a layered file.
Good at: everything the automatic tools struggle with, and this deserves to be said plainly. For glass, smoke, a bridal veil, motion blur, or hair against a background of similar tone, a hand-painted mask is genuinely better and it is not close. Semi-transparent edges need a human deciding how transparent each pixel should be, and that judgement is exactly what a mask lets you make.
Falls down when: you are in a hurry. A careful cutout of a complicated subject takes fifteen to forty minutes and real skill. Photoshop and Affinity cost money; GIMP is free but has the steepest learning curve.
A practical hybrid: run the automatic cutout first, then open the result in an editor and fix only the ten percent that went wrong.
Need the transparent file specifically? Our transparent background maker outputs a proper PNG with a real alpha channel — the layer that records which pixels are see-through — so it drops straight into a design.
5. Batch or scripted processing
What it is: processing many files in one operation instead of one at a time. This might be a batch upload in a web tool, an action or macro in a desktop editor, or a command-line script.
The steps in broad terms:
- Put every source file in one folder.
- Decide the output rules first: size, background, format, file naming.
- Run a test on five files and check them properly.
- Run the full set, then spot-check the output as a thumbnail grid.
Good at: volume. If you have 400 product shots, this is the only sane answer. It also enforces consistency, which matters more than per-image perfection when images sit side by side in a grid.
Falls down when: the set is varied. Batch processing applies one decision to every file, so the awkward ten percent — the glass bottle, the chrome handle, the flyaway hair — comes out wrong and needs a manual pass. Always keep the untouched originals.
Comparing all five
| Method | Speed | Cost | Edge quality | Batch | Skill needed |
|---|---|---|---|---|---|
| Online tool | Seconds per image | Free preview, paid full-res | Very good on normal subjects | Depends on tool | None |
| Phone built-in | Instant | Free | Good, no control | No | None |
| Software you own | 1–3 minutes | Free if you own it | Average | No | Low |
| Manual in an editor | 15–40 minutes | Free to paid | Best, especially hard edges | Via actions | High |
| Batch / scripted | Minutes for hundreds | Varies | As good as the setup | Yes | Medium to high |
Which one should you pick?
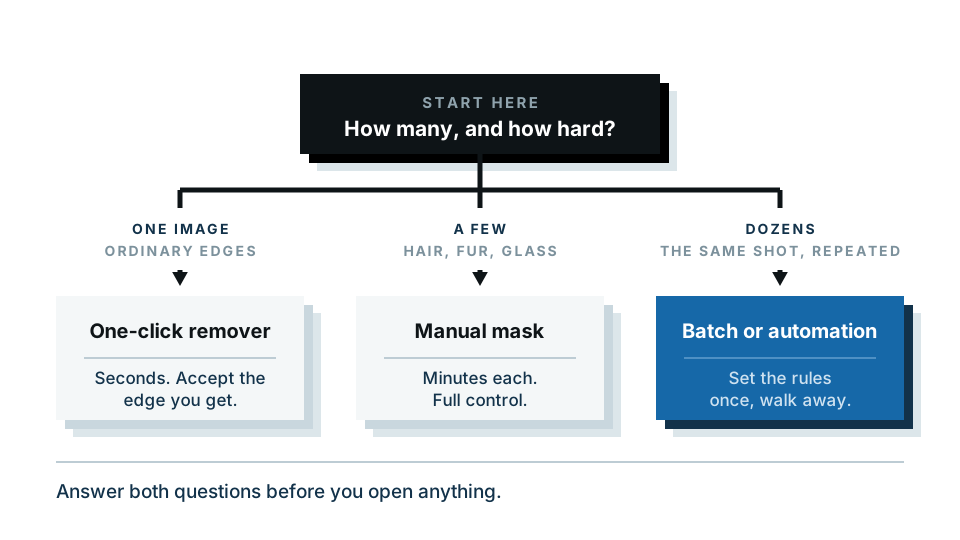
Answer it by counting your images.
One image, ordinary edges. Your phone if the photo is already there, an online tool if it is on your computer. Do not open Photoshop for this.
One image, hard edges. Glass, chrome, smoke, veils, wispy hair on a busy background: do it by hand, or run the automatic cutout first and repair the difficult twenty percent. This is the one case where the slow route is the right route.
Five to fifty images. An online tool, worked through in one sitting, with a naming convention agreed before you start. Consistency across the set matters more than any individual cutout.
Hundreds of images. Set your standard first — one output size, one background, one format — then batch, with a short human check at the end covering only the categories you know fail.
Locked-down work laptop. Use what you already have. PowerPoint’s Remove Background is better than its reputation.
Ready to cut something out now? Drop your photo into the background remover and see the result before you decide whether it needs a manual pass.
Frequently asked
What is the fastest way to remove a background from an image?
An online background remover is fastest for a single photo — drop the file in and the cutout appears in a few seconds. If the photo is already on your phone, pressing and holding the subject is faster still.
Can I remove a background for free?
Yes. Phone lift-the-subject tools are free, PowerPoint and Preview are free if you already own them, GIMP is free to download, and most online tools give you a free preview. Paid tiers usually buy you full resolution and batch processing.
Which method handles hair and fur best?
Automatic tools do a surprisingly good job on hair against a contrasting background. For very fine strands against a busy or similar-coloured background, a hand-painted layer mask in a full editor still wins.
Do I need Photoshop to remove a background?
No. Photoshop only earns its place when you need complete manual control — glass, smoke, motion blur or complicated hair. For everything else an automatic tool gets you there in a fraction of the time.
How do I remove the background from hundreds of images at once?
Use a batch or scripted route. Set your output size, background and file naming convention first, then process in batches so a mistake costs you one batch rather than the whole set.