Transparency
How to Make Image Backgrounds Transparent in Seconds
The fastest route to a transparent PNG, plus how to check the file really is transparent and the four things that slow everyone else down.
You want it done now, so here is the whole thing first.
- Open our transparent background maker.
- Drag your image onto the page.
- Wait a few seconds while the subject is detected and the background removed.
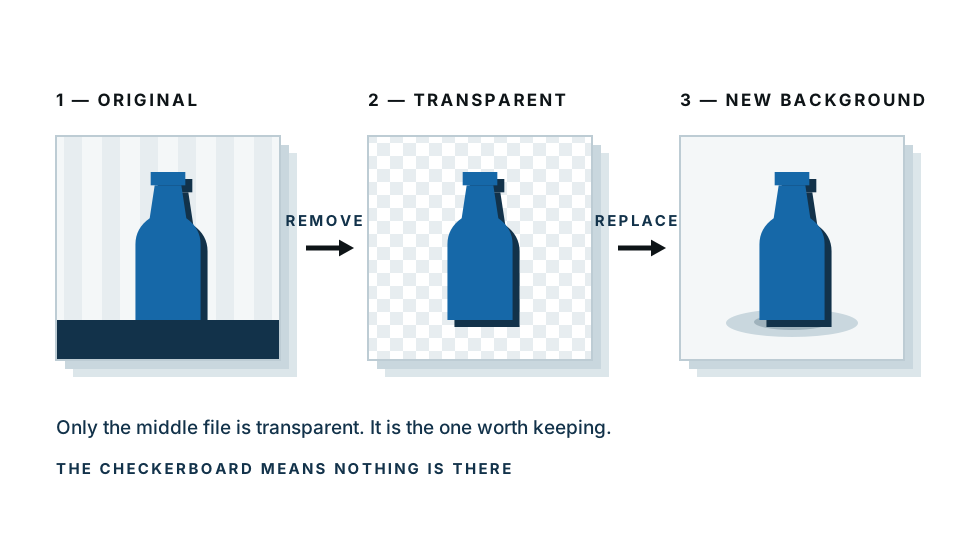
- Check the result — you should see a grey checkerboard where the background was.
- Download it as a PNG.
That is genuinely it. Everything below is for when something does not look right, or when you have forty images instead of one.
What does “transparent” actually mean?
Worth thirty seconds, because it explains almost every problem people hit.
Every pixel in a normal image stores three numbers: how much red, how much green, how much blue. A transparent image stores a fourth, called the alpha channel — a hidden value per pixel recording how see-through it is. Zero means completely invisible. Maximum means completely solid. Everything in between gives you a partly see-through pixel, which is what makes soft edges and wispy hair look natural instead of cut out with scissors.
Two consequences follow, and they cause most of the trouble:
- Only some formats have room for that fourth value. PNG and WebP do. JPG does not, at all.
- Transparency is not a colour. It is the absence of one. Which is why editors have to invent a way to show it.
Why the checkerboard?
Your screen cannot display “nothing”. So image editors draw a grey and white checkerboard wherever the alpha channel says a pixel is invisible.
That checkerboard is not in your file. It will not appear on your slide, your website or your t-shirt. It is a convention, nothing more.
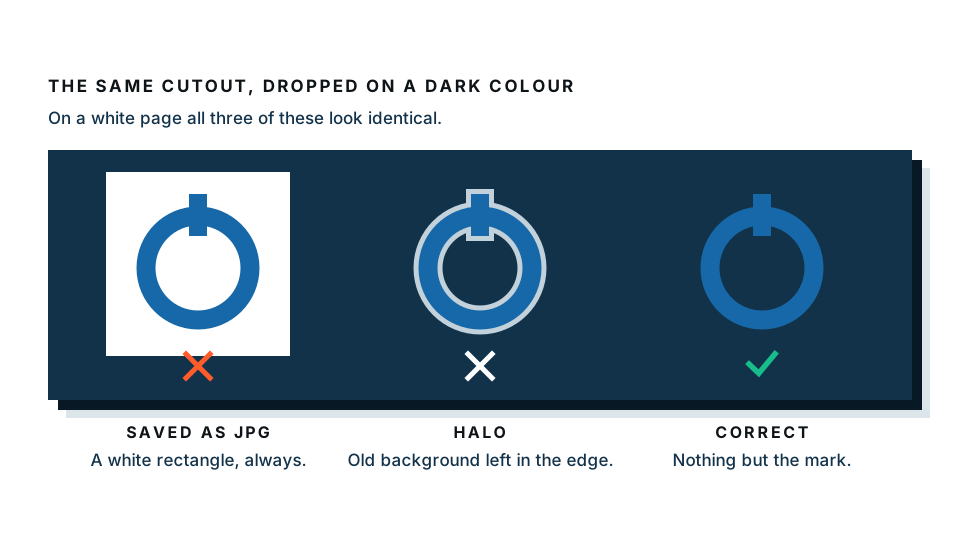
The useful part is the opposite: if you removed a background and you see flat white rather than a checkerboard, the background was not removed — it was replaced with white. Different thing entirely, and it will show up as a white box the moment you place it on a colour.
How do you check your file is really transparent?
Three quick tests, in order of speed.
- Look at the file size and extension. A
.jpgfile is never transparent. Ever. No exceptions. - Drop it onto a black background. A slide with a black fill, a dark document, anything. Leftover white boxes and pale edge halos are invisible on white and glaring on black.
- Open it in any editor and look for the checkerboard. Also check the enclosed gaps — inside a letter O, the space between an arm and a body, the hole in a mug handle. These are the areas most often left filled.
Do the black test before you use the file anywhere, not after you have placed it in thirty slides.
Which output do you actually need?
People often ask for “transparent” when they want something else. Check this before you export.
| What you want to do | What you need |
|---|---|
| Put a logo on a coloured slide or dark header | Transparent PNG |
| Sell on a marketplace that requires a plain backdrop | White background JPG |
| Overlay a subject on another image | Transparent PNG |
| Print on a t-shirt or sticker | Transparent PNG, at high resolution |
| Put your subject in a different scene or colour | New background, exported as JPG |
| Keep it lightweight on a website | Transparent WebP |
If your final destination is a solid white page anyway, a white background JPG is smaller and simpler. Transparency is only worth carrying when something needs to show through.
Doing more than one? Decide everything up front
If you have forty images, the slow part is not the cutouts. It is discovering on image thirty-eight that you should have used a different size, and going back through the first thirty-seven.
Before you start, settle three things and write them down:
- Output format. PNG for transparency, WebP if it is all going on a website. Pick one and stick to it.
- Output dimensions. Decide the width now, based on where the images will actually appear. Product grids, slide decks and marketplace listings all have their own expectations.
- Whether you want a shadow. Consistency matters more than the choice. A product range where half the items have shadows and half do not looks careless.
Then process them all the same way. Ten minutes of deciding saves an hour of redoing.
Halfway through a batch and want a fresh clean cutout? The background remover handles them one at a time in a few seconds each.
The four things that slow people down
1. The wrong output format
This is the biggest one by a distance. You do the work, the preview looks perfect, you save as JPG out of habit, and the transparency is gone.
It is not just the save dialogue either. Compression tools, resizers, image optimisers and some upload forms will quietly convert to JPG. If a file goes through a pipeline, check it comes out the other end still transparent.
2. Hair and fur edges
Fine strands are the hardest case in the whole field, and honestly so.
The reason is that a single pixel at the edge of someone’s hair is partly hair and partly background. To cut it out properly you need to work out that mixture and remove exactly the background portion. That is a genuinely difficult judgement, and it gets worse as the background gets busier or closer in colour to the hair.
What helps: a plain, contrasting background behind the subject when the photo is taken, good separation between subject and backdrop, and a large original image. What does not help: expecting perfection from a small, busy, low-contrast photo. Nobody gets that right.
3. Glass, smoke and anything you can see through
The honest answer here is that a cutout has to guess.
Transparency in the real world and transparency in a file are different problems. A wine glass shows you whatever is behind it. When you cut the glass out, that background is baked into the glass’s own pixels — the tool cannot separate “the glass” from “the kitchen visible through the glass”, because in the photo they are the same pixels.
So you get one of two outcomes: the old background travels along inside the glass, or the glass becomes a solid shape and stops looking like glass. Same for smoke, steam, water, veils, net curtains and motion-blurred edges.
For product work, the practical answer is to shoot glassware on the background you intend to keep, or on white and accept a slightly stylised result. For creative work, plan to do the see-through parts by hand.
4. The image is too small to start with
Cutouts do not add detail. If your subject is 250 pixels tall, there is not enough edge information to produce a clean outline, and enlarging afterwards just makes the roughness bigger.
Find the original. Not the version pasted into a document, not the screenshot, not the one that came off a messaging app — those are all re-compressed and softened. The original file will cut out visibly better.
A note on privacy
The free preview runs entirely inside your browser. Your image is not uploaded anywhere — it stays on your device. That matters for ID photos, client work, unreleased products and anything personal.
To be straight with you: the paid full-resolution download is processed on our server. So if you need the high-resolution file, that image does leave your device. The preview does not.
Before you close the tab
- File ends in
.pngor.webp - Checkerboard visible where the background used to be, not white
- Looks clean when placed on black
- Enclosed gaps are genuinely see-through
- Large enough for its final use — you cannot get detail back later
Ready? Drop your image into the transparent background maker and you will have a PNG in about ten seconds.
Frequently asked
How do I make an image background transparent quickly?
Upload the image to an automatic background remover, let it detect the subject, and download the result as a PNG. It takes a few seconds and needs no editing skill. The only thing you must get right is the output format — PNG, never JPG.
What does the grey checkerboard mean?
It means transparency. Image editors cannot draw 'nothing', so they draw a checkerboard instead. It is not part of your file and will not appear when you use the image. If you see solid white instead, the background was not actually removed.
Why does my transparent image turn white when I save it?
You saved it as a JPG. JPG has no way to store transparency, so it fills every empty pixel with white. Save as PNG or WebP instead — and check that any tool you pass it through afterwards is not silently converting it.
How do I check whether an image is really transparent?
Place it on a black or bright-coloured background and look. White backgrounds hide both leftover white boxes and pale edge halos. Black shows you the truth in one glance.
Can you make glass or smoke transparent properly?
Not perfectly. A cutout has to decide how see-through each pixel is, and for glass, smoke, veils and water it is genuinely guessing. Expect either the old background showing through or a hard-edged shape where a soft one should be.