Transparency
How to Convert an Image to a Transparent PNG
Turn any JPG into a PNG with a genuinely transparent background: what transparency is, how to do it in seconds, and how to verify it worked.
There is a small misunderstanding hiding inside this question, and clearing it up saves a lot of frustration.
Changing a file from JPG to PNG does not create transparency. It changes the container. If the picture has a white background, you now have a PNG with a white background — the same image in a different wrapper.
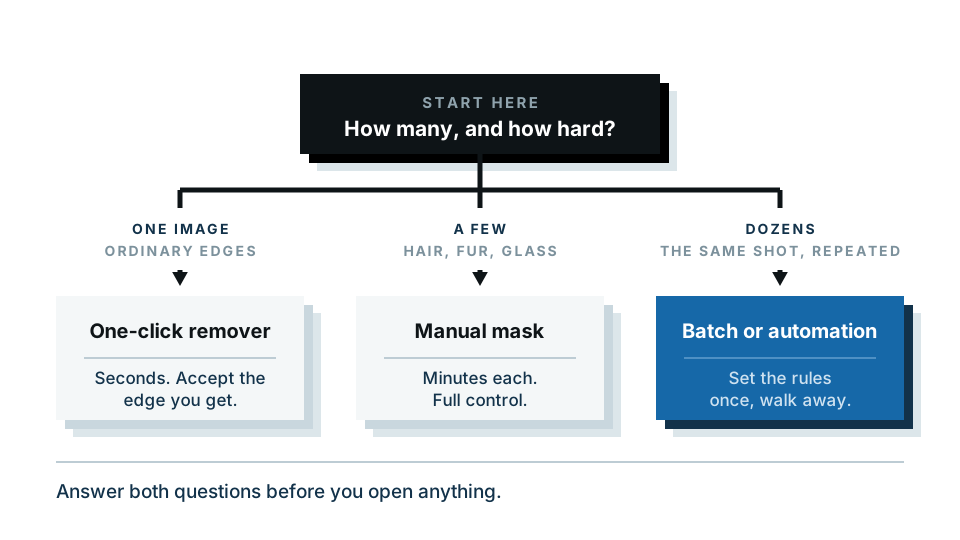
What you actually need is two steps: remove the background, then save as PNG. This guide covers both, plus how to verify it worked and how to keep the file size sensible.
Quick summary: remove the background first, save as PNG second, and confirm by looking for the checkerboard or by placing the file over black.
Have your image ready? Convert it to a transparent PNG — the free preview runs entirely inside your browser, so your image is never uploaded.
What transparency actually is
Every pixel in an image stores colour: how much red, green and blue. A transparent image stores one extra value per pixel — the alpha channel — recording how opaque that pixel is.
- Alpha at maximum: the pixel is fully solid.
- Alpha at zero: the pixel is completely invisible.
- Alpha in between: the pixel is partly see-through.
That middle range is what makes a good cutout look good. The edge of a subject is not a hard line — it is a few pixels of partial transparency that let the subject blend into whatever is behind it. Without those, a cutout looks like it was done with scissors.
JPG has no alpha channel. There is nowhere to put “this pixel is empty”, so empty becomes white. That is the whole story of the white box problem.
The fast way: automatic
- Open the transparent background maker.
- Drop your image in — JPG, PNG, HEIC or WebP all work.
- The subject is detected and the background removed automatically.
- Look at the preview. The checkerboard behind your subject means genuine transparency.
- Download as PNG.
This takes a few seconds and requires nothing to install. It works on a phone as well as a laptop.
Why the browser matters here: our free preview does the entire cutout on your own device. The image is not sent to us or anyone else while you are working with it. If you go on to buy the full-resolution download, that file is processed on our server — worth saying plainly, because the distinction is the point.
What to check before you download
- Edges at 100% zoom. Hair, fur and fine detail are where problems show.
- Enclosed gaps — the hole in a handle, the space between an arm and a body. These should be transparent, not filled.
- Thin elements — a strap, a stem, a wire, a chain. These sometimes get trimmed.
- Semi-transparent parts — glass, smoke, a veil. These are genuinely hard and may need manual work.
The manual ways
In Photoshop
- Open the image and click the padlock on the Background layer to unlock it.
- Select → Subject for an automatic first pass.
- Select → Inverse, then press Delete.
- For better edges, undo the delete, then click Select and Mask. Use the Refine Edge Brush around hair, then output to a Layer Mask.
- File → Export → Export As, choose PNG, and tick Transparency.
In GIMP
- Layer → Transparency → Add Alpha Channel. Skip this and Delete gives you white.
- Use Fuzzy Select (U) on a flat background, or the Free Select tool (F) to draw around your subject and then Select → Invert.
- Select → Shrink by 1 pixel, then Select → Feather by 1 pixel.
- Press Delete.
- File → Export As, type a filename ending in .png.
In Paint on Windows 11
- Home → Remove background.
- File → Save as → PNG picture.
In Preview on a Mac
- Open the image in Preview.
- Click the markup toolbar icon, then the Instant Alpha wand.
- Drag across the background to select similar colours, then press Delete. Preview will offer to convert the file to PNG — accept.
- Repeat for other background areas.
- File → Export, choose PNG, and make sure Alpha is ticked.
On a phone
Both iOS and Android have a built-in subject lift. Long-press the subject in a photo, then choose Copy or Share. Paste it into a notes app or file manager to save it. The cutout quality is decent, though you get no control over the edge.
Manual approach not going well? Try the automatic version and compare the edges — it takes seconds and costs nothing to look.
How do you verify it actually worked?
This is the step people skip, and it is the reason white boxes reach production.
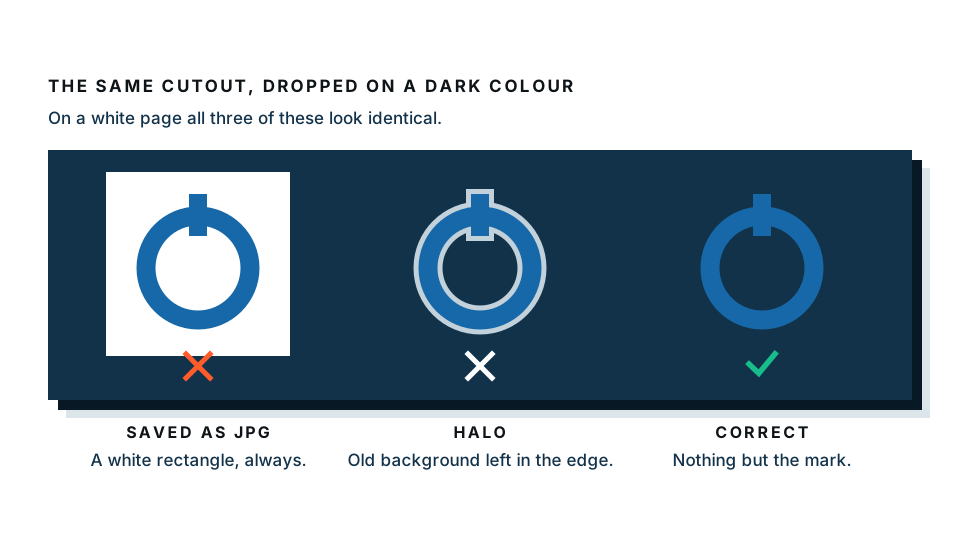
Test 1: the checkerboard. Open the PNG in any editor. A grey and white checkerboard behind the subject means real transparency. A white area means no transparency.
Test 2: over black. The definitive test. In any tool, place your PNG over a black rectangle. Any surviving white background will be unmissable. Do this before you upload anything important.
Test 3: the file size. A transparent PNG of a cut-out subject is usually smaller than the original full-frame photo, because large areas contain nothing. If your “transparent” PNG is the same size as the original, be suspicious.
PNG file sizes, and when to use WebP instead
PNG is lossless — it discards nothing. That is excellent for quality and expensive for file size, especially on photographs, which have too much variation to compress well.
Ways to keep the file sensible:
- Resize before exporting. A 4000-pixel-wide image displayed at 600 pixels is wasting most of its data. Export at roughly the size it will be shown, or double that for high-density screens.
- Use PNG-8 for simple graphics. Logos, icons and flat illustrations with few colours compress dramatically as 8-bit PNG, and it still supports transparency.
- Run it through a PNG optimiser. These strip metadata and re-encode, typically saving 20 to 60 percent with no visible change.
- Use WebP for the web. WebP supports transparency and produces files roughly 25 to 35 percent smaller than PNG at similar quality. Every current browser supports it.
| Format | Transparency | Compression | Best for |
|---|---|---|---|
| PNG-24 | Yes, full alpha | Lossless, large | Photographic cutouts, master files |
| PNG-8 | Yes, limited | Lossless, small | Logos, icons, flat graphics |
| WebP | Yes, full alpha | Lossy or lossless | Web delivery |
| AVIF | Yes | Very efficient | Web, where support allows |
| JPG | No | Lossy | Photos with a background |
| SVG | Yes, by nature | Vector, tiny | Logos and icons that must scale |
Common problems
I renamed the file to .png and nothing changed. Renaming changes the label, not the contents. You have to actually remove the background and re-save.
There is a white or grey fringe around my subject. Leftover background pixels in the edge. Shrink the selection by a pixel before deleting, or use a tool with proper edge handling.
It looks transparent in my editor but white on my website. You probably uploaded a different file, or the browser cached an older version. Check the uploaded file directly and hard-refresh.
The middle of my letters is filled in. Enclosed shapes were not included in the selection. Shift-click each one, or use an automatic tool.
My transparent PNG has a black background in an old program. Some older software cannot read alpha channels and renders empty pixels as black. Nothing is wrong with your file — the reader is the problem.
It looks pixelated after enlarging. PNG is raster, so enlarging invents nothing. Start from a larger original, or use SVG for artwork that must scale.
Where transparent PNGs are essential
- Logos on coloured backgrounds, headers and dark mode
- Product images that will be placed on different backgrounds
- Print-on-demand artwork, where a white box actually prints
- Stickers, overlays and watermarks
- Icons and interface elements
- Video overlays and lower thirds
- Slides and documents with a coloured background
In every one of these, a JPG will let you down at the last moment.
Two habits worth keeping
Save a transparent master. Do the cutout once, keep the transparent PNG at full size, and derive every other version from it. Re-cutting the same subject is the most common wasted effort in image work.
Test over black before you publish. It takes five seconds and catches the one mistake that everyone makes eventually.
Make your transparent PNG now — free preview, processed on your own device, and you will know within seconds whether the edges hold up.
Frequently asked
Can I convert a JPG to a transparent PNG?
You can change the format, but that alone adds nothing. A JPG has no transparency information, so you must remove the background first, then save the result as PNG.
How do I know if my PNG is really transparent?
Open it and look for a grey and white checkerboard pattern behind the subject. Or place it over a black rectangle — a white box will be obvious immediately.
Does converting to PNG reduce quality?
No. PNG is lossless, so nothing is discarded. But it cannot recover detail already lost to JPG compression in the original file.
Why is my PNG file so large?
PNG is lossless, so photographs produce big files. Reduce the pixel dimensions to what you actually need, or use WebP, which supports transparency at a much smaller size.
What is an alpha channel?
An extra value stored for every pixel recording how opaque it is, from fully solid to fully invisible. It is the thing PNG has and JPG does not.