Transparency
How to Create and Save Images With Transparent Backgrounds
Make a transparent image and save it so the transparency actually survives, including which formats keep it and why your PNG might still show white.
Two separate problems live inside this one question. Making the transparency is easy. Keeping it through saving, exporting, uploading and reopening is where most people lose it.
This guide covers both, and explains why your PNG might still be showing a white box.
Make a transparent image now →
What is transparency, actually?
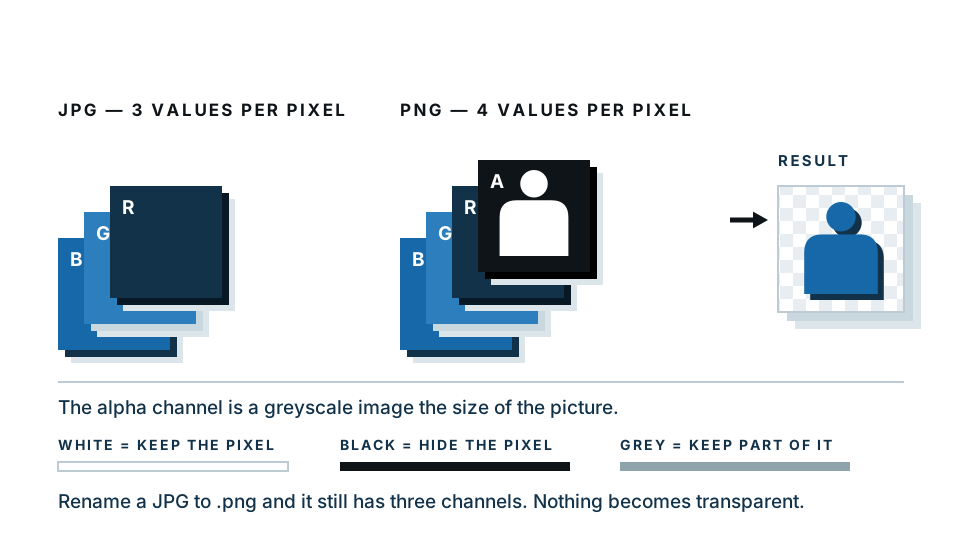
A normal image stores three numbers per pixel: red, green and blue. Every pixel must have a colour. There is no way to say “nothing here”.
A transparent image stores a fourth number: alpha. It records how opaque that pixel is, from 0 (invisible) to 255 (fully solid).
This matters for a reason that trips people up constantly: alpha is not a colour, it is a separate channel, and only some file formats have somewhere to put it.
Partial transparency is the important bit
Alpha is not just on or off. A pixel can be 40% opaque.
This is what makes good cutouts look real. The wispy ends of hair, the soft edge of fur, the blur on a moving hand, the tint of a glass — all of these are partially transparent. A tool that only does fully-in or fully-out produces the hard, cut-with-scissors edge that immediately looks wrong.
Which formats keep transparency?
| Format | Transparency | Best for |
|---|---|---|
| PNG | Full, 256 levels | The default answer. Works everywhere |
| WebP | Full, 256 levels | Websites — much smaller files |
| SVG | Yes, by nature | Logos and icons; scales infinitely |
| GIF | On/off only, 1 level | Simple animations only |
| TIFF | Full | Print workflows |
| JPG | None | Photos with no transparency |
| Yes | Print documents |
The JPG problem
JPG is the most common image format in the world and it cannot store transparency. At all. Not badly — not at all.
When you save a transparent image as JPG, the software has to put something in the transparent pixels, and it puts white. Silently. No warning.
This is the cause of roughly every “my transparent image has a white background” question ever asked.
The rule: if it needs transparency, it is not a JPG.
How to create a transparent background
The fast way
- Open the transparent background maker.
- Drop your image in.
- The subject is separated from the background automatically.
- Check the edges — zoom in on hair, thin objects and anything semi-transparent.
- Refine with the brush if anything is missing or left over.
- Download as PNG.
Our free preview runs entirely inside your browser. The image is processed on your own machine and never uploaded, which matters for client work, documents, unreleased products and family photos.
Checking it properly
Here is the step people skip: preview the result on a dark background.
A pale halo around your subject is invisible on white and glaringly obvious on black. Most transparency mistakes are only discovered after the file has been used somewhere.
Also check:
- Enclosed gaps — the space inside a handle, between an arm and a body, inside the letter O. These often get left filled.
- Thin elements — glasses arms, chains, aerials, cables. Frequently cut away.
- Semi-transparent areas — glass, veils, smoke. These should be partly see-through, not solid.
Check yours on a dark background →
How to save it without losing the transparency
In a browser tool
Choose PNG (or WebP) at the download step. That is usually the only decision.
In Photoshop
File → Export → Export As → PNG, with Transparency ticked.
Do not use “Save As JPG”. Do not use “Save for Web” set to JPG. Both will flatten to white.
If you use Save As PNG, make sure the layer is unlocked and the background layer has actually been removed rather than hidden — a hidden white layer still exports as white in some paths.
In GIMP
File → Export As, and type a filename ending in .png.
Critically: the image must have an alpha channel. Layer → Transparency → Add Alpha Channel first. Without it, deleting the background fills it with the background colour instead of clearing it.
In Canva
Transparent PNG export is a paid feature. Download → PNG → tick Transparent background.
In PowerPoint or Google Slides
Right-click the image and choose Save as Picture, selecting PNG. Note that this saves what is on the slide, so remove any slide background first.
Why your transparent PNG might still show white
Work through these in order.
1. It is actually a JPG. Check the real file extension, not the name. A file called logo.png can still be a JPG internally if it was converted carelessly.
2. The viewer renders transparency as white. Some file previewers and older image viewers do this. Test by placing the image on a coloured background in a real editor.
3. It was flattened before export. A white layer beneath your subject exports as white. Hide or delete it.
4. The platform composites it. Some websites and apps place uploaded images onto a white canvas. The file is fine; the destination is not. There is usually no fix beyond using a different upload path.
5. Printing. Paper is the background. Transparency on a printed page means “the paper shows through”, which is white unless the paper is not.
When should you use transparency?
Yes:
- Logos, anywhere.
- Product images that will sit on different coloured backgrounds.
- Cutout subjects for slides, cards and social posts.
- Icons and UI elements.
- Watermarks and overlays.
- Anything you might reuse on a background you have not chosen yet.
No:
- Ordinary photographs. There is nothing to be transparent.
- Anything going somewhere that only accepts JPG.
- Large photographic images on a website where file size matters — PNG is much bigger than JPG for photographs.
The master file habit
Whenever you make a cutout you will use more than once, save two files:
- The transparent PNG master, at full resolution, in an archive folder.
- Whatever flattened version you need today — on white, on a colour, at web size.
From the master you can generate every future version without redoing the cutout. It costs nothing and it saves the same work being done four times.
Common problems
“The edges look jagged.” The cutout was made at low resolution, or with a hard threshold. Redo it from a larger source.
“There is a white outline on dark backgrounds.” The cut was slightly loose, keeping a rim of background pixels. Tighten the edge or use a tool with colour decontamination.
“The file is enormous.” PNG stores photographic detail inefficiently. Try WebP, or reduce the dimensions to what you actually need.
“It works on my machine but not on the website.” The platform is flattening it. Check whether it accepts PNG at all before assuming your file is broken.
“Some of the subject is missing.” Thin or pale elements were read as background. Brush them back in.
Do it now
Take one image, make the background transparent, save it as PNG, and drop it onto a black background to check. That whole loop takes about a minute, and once you have done it once the format rules stop being abstract.
Frequently asked
Which file formats support transparency?
PNG, WebP, GIF, SVG and TIFF. JPG does not, and never will — it has no alpha channel, so any transparency is flattened onto white when you save.
Why does my transparent PNG still have a white background?
Either it was saved as JPG and renamed, it was flattened onto white before export, or you are viewing it in something that renders transparency as white. Drop it onto a coloured background to check properly.
What is the checkerboard pattern?
It is how editors display transparency. Those grey and white squares are not part of your image and will not appear when you use the file.
Is PNG or WebP better for transparent images?
WebP files are typically much smaller at similar quality, which is better for websites. PNG has wider compatibility, so it is the safer choice for files you will hand to other people or other software.
Can I make a transparent image without uploading it anywhere?
Yes. Our free preview runs entirely inside your browser, so the image is processed on your own machine and never uploaded.