General
How to Fix Grainy Photos and Upscale Images Online
Reduce noise in grainy photos and enlarge small images without turning them to mush, plus how to avoid grain in the first place.

Two problems, one guide, because they usually arrive together: a photo that is both too small and too noisy, and you need it to look presentable.
Here is what is genuinely fixable, what is not, and the order to do things in.
One quick trick first: replace the noisiest part of the photo →
Why are photos grainy?
Grain — properly, noise — is random variation in brightness and colour that was never in the scene.
It happens because a camera sensor collects light, and when there is not much light to collect, the camera amplifies what it got. Amplifying a weak signal amplifies the random errors along with it. That is ISO.
Four things make it worse:
- Low light. The root cause of almost all noise.
- Small sensors. Phones collect less light than cameras. Physics, not software.
- Lifting shadows in editing. Brightening a dark area amplifies whatever noise was hiding there.
- Heavy cropping. Cropping means enlarging, and enlarging makes grain bigger and more obvious.
What can and cannot be fixed
Genuinely fixable:
- Noise in flat areas — skies, walls, skin, backgrounds.
- Colour blotches, the ugly red and green speckles in shadows.
- Moderate softness from a slightly missed focus.
- Small images that need to be somewhat larger.
Not fixable:
- Motion blur. The detail was smeared across pixels and is gone.
- Badly missed focus. Same reason.
- Detail that was never captured. No tool recovers information that does not exist.
- A 200-pixel image needed at poster size. You can make it bigger; you cannot make it good.
Being clear about this saves an hour of frustration. Aim for “looks fine at the size it will be viewed”, not “looks like it was shot on a better camera”.
Fixing grain: the order of operations
Do these in order. Changing the order makes things worse.
1. Fix exposure and colour first
Noise reduction works on the image you give it. If you are going to brighten the photo, do that first, so the noise reduction sees the noise you will actually be looking at.
Lift shadows, set the white point, correct any colour cast. Then move on.
2. Remove colour noise before luminance noise
Noise has two components, and they need different treatment.
- Colour noise — the red, green and blue speckles. Ugly, and almost completely removable with no loss of detail. Be aggressive here.
- Luminance noise — the grainy brightness texture. Removing this costs detail, so be gentle.
Most tools have separate sliders. Push colour noise reduction high. Nudge luminance reduction until the worst of the grain softens and then stop.
3. The stopping rule
Stop when the photo stops looking like a photo.
Over-denoised images look waxy — skin like plastic, foliage like a smear, hair like a solid shape. This is worse than grain. Grain reads as “photograph taken in low light”. Waxy reads as “something is wrong with this image”.
Zoom to 100%, apply the effect, then zoom back out to the size it will actually be viewed at. Judge it there.
4. Sharpen last, lightly
Noise reduction softens. A small amount of sharpening afterwards restores apparent crispness. A large amount brings the noise straight back.
Use a small radius and a low amount, and apply it to edges rather than flat areas if your tool offers a masking control.
The background trick
Here is the shortcut most guides miss, and it is often the single most effective fix.
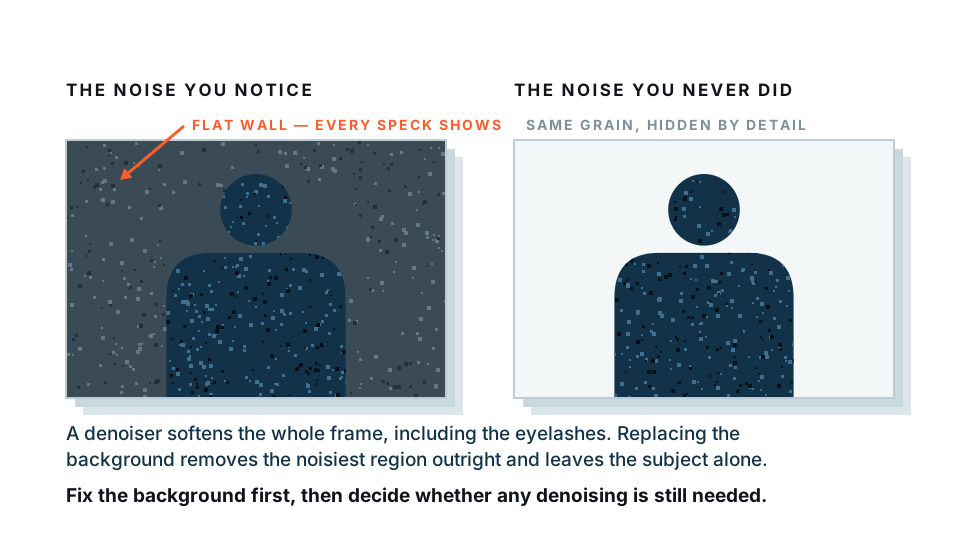
Grain is most visible in flat, even areas. A grey wall, a sky, an out-of-focus room. Those areas have no detail to distract the eye, so every speckle shows.
In most portraits and product photos, the flattest area in the frame is the background — and you do not need it.
So instead of fighting the noise across the whole image:
- Remove the background entirely.
- Replace it with clean flat colour or a smooth gradient.
The noisiest part of the photo is simply gone. The subject may still have some grain, but grain on a detailed subject is far less noticeable than grain on a flat wall.
How to do it:
- Open the background changer.
- Drop your photo in.
- Choose a flat colour or a new background.
- Download.
Our free preview processes the image inside your browser, so nothing is uploaded.
For a plain white result, the white background maker goes straight there in one step.
Replace a noisy background with clean colour →
Upscaling: making images bigger
What upscaling actually does
Old-fashioned enlargement stretches pixels and interpolates between them, which produces a soft, blurry result.
Modern upscaling uses models trained on millions of images to predict what the extra detail should look like. When it works, it is remarkable, particularly on faces, text and hard edges.
But it is important to be honest about what it is: it invents plausible detail. It does not recover the original. On a face, this can subtly change features. On text, it can turn one letter into another. Check the result before using it anywhere consequential.
How much enlargement is safe?
| Scale | Result |
|---|---|
| 2× | Usually excellent, looks natural |
| 3× | Good on simple subjects, softer on complex ones |
| 4× | Workable, but artefacts become visible |
| 8×+ | Increasingly artificial regardless of the tool |
The correct order
Denoise first, then upscale. Always.
If you upscale a noisy image, the model interprets the grain as detail and enlarges it faithfully, producing large, chunky, structured noise that is much harder to remove afterwards.
Clean the image, then enlarge it.
After upscaling
- Check faces closely. This is where invented detail is most noticeable and most objectionable.
- Check any text. Upscalers frequently mangle small lettering.
- Add a very small amount of grain back if the result looks too clean. A tiny bit of texture makes an upscaled image read as photographic rather than synthetic.
Preventing grain in the first place
Far easier than fixing it.
- Shoot in more light. Move toward a window. Go outside. This solves more than any software.
- Keep ISO as low as the shot allows.
- Hold still, or prop the phone on something. A steadier shot lets the camera use a longer exposure and less amplification.
- Do not zoom with your fingers on a phone. Digital zoom is a crop, and crops magnify noise. Move closer instead.
- Expose slightly brighter rather than darkening the scene and lifting it later. Lifting shadows is the fastest way to create noise.
- Use night mode if your phone has it. It combines several exposures and genuinely reduces noise.
A realistic workflow
- Fix exposure and colour.
- Remove colour noise aggressively.
- Reduce luminance noise gently. Stop before it looks waxy.
- If the background is the noisy part, replace it entirely. Often you can skip steps 2 and 3 almost completely.
- Upscale if needed, no more than 2× to 4×.
- Sharpen lightly.
- View at final size and decide whether it is good enough. It usually is, and the pixel-peeping was never necessary.
Start with the background
If your grainy photo has a subject and a background — a portrait, a product, a pet — try replacing the background before you touch a noise slider. It is the fastest improvement available, and it takes about ten seconds.
Frequently asked
What causes grainy photos?
High ISO in low light, mostly. When there is not enough light, the camera amplifies the signal, and it amplifies the random errors along with it. Small phone sensors and heavy shadow-lifting make it worse.
Can you actually fix a grainy photo?
You can reduce grain convincingly. You cannot recover detail that was never captured. Expect improvement, not restoration, and stop before the photo looks like plastic.
Does upscaling an image add real detail?
No. Upscaling invents plausible detail based on patterns. It often looks good, especially on faces and text, but it is a guess, not recovered information.
How much can I enlarge an image?
Two times is usually safe and looks natural. Four times can work on simple subjects. Beyond that, results get soft and artificial regardless of the tool.
Does removing the background help a grainy photo?
It can help a lot. Grain is most visible in flat areas, and backgrounds are usually the flattest part of a photo. Replacing a noisy background with clean colour removes most of the visible grain instantly.