Other software
High-Quality Background Remover for High-Resolution Images
What changes when your image is 24 megapixels: resolution limits, edge quality at full size, and how to get a print-ready cutout without downscaling.
Removing the background from a phone snap and removing it from a 45-megapixel studio file are the same operation with very different stakes. At small sizes, a slightly rough edge is invisible. At A2 print size, every imperfect pixel along a shoulder is a visible line.
This guide covers what actually changes at high resolution, why so many tools quietly downscale your image, and how to get a cutout that holds up at full size.
Quick summary: start from the largest original you have, check the edges at 100% rather than fit-to-screen, and make sure the file you download is genuinely full resolution rather than an upscaled preview.
Working with a large file? Try the background remover — the free preview runs in your browser on your own machine, which is worth knowing before you hand a 40MB client file to any web service.
What counts as high resolution?
Resolution is just the pixel count. What matters is the pixel count relative to the size you will display or print at.
| Source | Typical pixels | Comfortable print size at 300 DPI |
|---|---|---|
| Phone photo, 12 MP | 4032 x 3024 | About A4 |
| Mirrorless, 24 MP | 6000 x 4000 | About A3 |
| Full-frame, 45 MP | 8192 x 5464 | About A2 |
| Medium format, 100 MP | 11648 x 8736 | Larger than A1 |
| Web image | 1200 x 800 | Postcard, at best |
The arithmetic for print: printed inches x 300 = pixels needed. A 20-inch-wide print needs 6000 pixels across. Nothing recovers detail that is not there, so this is a hard constraint, not a preference.
Why tools downscale, and how to tell
Removing a background is computationally expensive, and cost scales roughly with pixel count. A 45-megapixel image is around fifteen times the work of a 3-megapixel one. That is why almost every online tool has the same shape: a free result at reduced size, and full resolution behind a payment.
How to check what you actually got:
- Download the file.
- Check its pixel dimensions — right-click and view properties, or open it in any editor.
- Compare against your original.
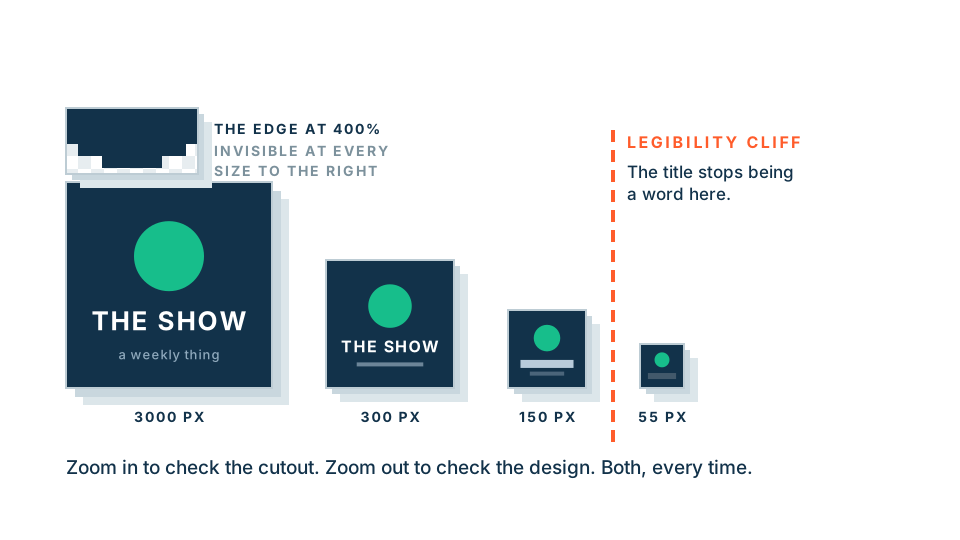
Watch for a subtler version of the same thing: a file that has the right pixel dimensions but was processed small and then enlarged. The tell is soft, slightly blurry edges — the subject looks fine but the boundary has no crisp detail. Zoom to 100% on a hair edge and you will see it immediately.
Our position, stated plainly: the free preview runs in your browser and is limited by what your device can handle. The paid download gives you the full-resolution result, processed on our server. We would rather describe the trade than let you find it at checkout.
Does resolution improve cutout quality?
Up to a point, yes, and it is worth understanding why.
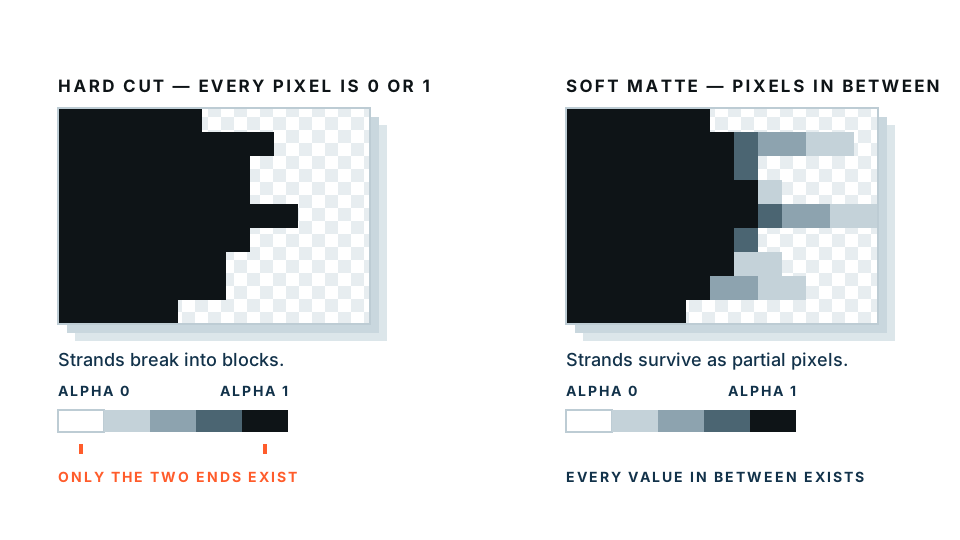
A cutout decision happens along the boundary between subject and background. In a 1000-pixel-wide image, a strand of hair might be one pixel wide — either it is in or it is out, and there is no third option. In a 6000-pixel-wide image, that same strand is six pixels wide, with soft partly-transparent pixels on each side. There is enough information to represent it properly.
That is why high-resolution originals produce noticeably better hair, fur and fine detail.
But resolution is not the only factor. A large file that is out of focus, motion blurred or noisy gives no advantage. A sharp 12-megapixel image beats a soft 45-megapixel one every time. What you want is detail, and pixel count is only one contributor to it.
Preparing a large image for the best result
Start from the original
Not the version you emailed to yourself, not the one exported for Instagram, not a screenshot. Every re-save and re-export loses information. Go back to the camera file if you can.
Shoot for the cutout
If you control the photography, the choices that matter most at high resolution:
- Depth of field. A soft edge is ambiguous at any resolution and the ambiguity is magnified when you print large. Use a smaller aperture for products.
- Low ISO. Noise looks like texture, and near an edge it confuses both automatic tools and your own eye.
- Contrast with the background. Still the single biggest factor. All the megapixels in the world do not help if the subject and background are the same tone.
- Sharp focus on the edge, not just the centre. Check the focus at the subject’s outline, which is what will be cut.
Do the cutout before other edits
Colour grading, sharpening and retouching are best applied after the cutout, not before. Heavy sharpening in particular creates a bright halo along high-contrast edges, and that halo becomes part of what the cutout follows.
Keep a transparent master
Save the full-resolution cutout as a transparent PNG. Every smaller version derives from it. Never re-cut the same subject at a different size.
Ready to process the full-size file? Open the background remover — preview locally first, then take the full-resolution download when you are happy with the edges.
Checking a high-resolution cutout properly
At full size, “looks fine” is not an assessment. Do this instead.
- View at 100%, not fit-to-screen. Fit-to-screen on a 6000-pixel image is showing you a quarter of the real detail.
- Walk the outline. Start at the top and pan around the entire edge. It takes a minute and catches everything.
- Place it on a contrasting background. A cutout on white hides white fringing completely. Put it on mid-grey and on black.
- Check the difficult regions specifically:
- Hair, especially flyaway strands against a busy area
- Where the subject is out of focus, if depth of field was shallow
- Semi-transparent material: glass, mesh, chiffon, smoke
- Thin elements: straps, wires, chains, stems
- Enclosed gaps that should be transparent
- Check for colour contamination. Background colour reflected onto the subject’s edge — common with strongly coloured backdrops — survives the cutout and looks wrong on a new background.
File format and size at high resolution
A 45-megapixel transparent PNG can easily be 100MB or more. That is fine as a master and unusable as a delivered file.
| Use | Format | Note |
|---|---|---|
| Master archive | PNG, full size | Lossless, keep forever |
| Print supplier | PNG or TIFF, 300 DPI at print size | Check what they accept |
| Website | WebP, sized for display | 25–35% smaller than PNG |
| Marketplace listing | JPG on white, 2000–3000 px | No transparency needed |
| Client proof | JPG, 1500 px | Fast to send and review |
Two rules: never upscale, and never deliver a 100MB PNG to a web page. Resize deliberately for each destination from the master.
When high resolution genuinely matters
- Print. Posters, packaging, exhibition graphics, editorial spreads.
- Large screens. Retail displays, exhibition stands, TV.
- Anything with zoom. Marketplace listings where customers can magnify the product.
- Archival work. Cut it out once at full quality and every future use is covered.
- Composites. If you will scale, rotate or crop into the cutout later, you need headroom.
And when it does not: social posts, email, most website images, thumbnails. For those, a smaller file processed quickly is the right answer, and paying for full resolution is money spent on pixels nobody will see.
Common problems at high resolution
The edge looks soft even though the file is large. It was processed small and upscaled. Check the edge detail, not the pixel dimensions.
Processing failed or timed out. File too large for the tool or the device. Reduce the dimensions somewhat, or use the server-side full-resolution route.
There is a coloured fringe along the whole subject. Colour spill from the original backdrop. Fix it by desaturating a narrow band along the edge, or shoot against a neutral backdrop next time.
Hair looks like a solid block. Not enough contrast in the original for individual strands to be distinguishable. This is a shooting problem — a rim light behind the subject solves it.
The cutout is perfect but the file will not open in my print software. Very large PNGs can exceed some applications’ limits. Convert to TIFF, which handles large files and transparency well.
The short version
Start from the biggest, sharpest original you own. Preview the cutout locally and inspect the edge at 100% on a contrasting background. Take the full-resolution version only when the edges hold up. Save a transparent master and derive everything else from it.
Start with the free preview — it runs on your own machine, so you can check a large client file thoroughly before anything is uploaded anywhere.
Frequently asked
Why do background removers reduce my image resolution?
Processing a very large image costs far more computing power, so most tools run the free version at a reduced size and reserve full resolution for paid downloads.
What resolution do I need for print?
300 DPI at the final printed size. An A4 print at 300 DPI needs roughly 2480 x 3508 pixels. Multiply the printed size in inches by 300 to get the pixel requirement.
Does a bigger file give a better cutout?
Usually yes, up to a point. More pixels along an edge means more detail to work with, especially in hair. But a large file that is soft or noisy gives no advantage over a sharp smaller one.
Can I upscale a cutout after removing the background?
You can, but upscaling adds pixels without adding real detail, and cutout edges show it clearly. Always start from the largest original you have.
Will my high-resolution photo be uploaded?
Not for the free preview — that runs entirely inside your browser. The paid full-resolution download is processed on our server.