People & portraits
How to Remove the Background for a Passport Photo
Get a clean, even background for a passport or visa photo — what the rules actually require, how to fix a poor background, and when to reshoot instead.
Passport and visa photos get rejected for small, avoidable reasons, and the background is one of the most common. A shadow behind the head. A slightly patterned wall. A cream wall that photographs green under an energy-saving bulb.
This guide covers what the rules generally require, how to fix a background you already have, and — importantly — when editing is the wrong answer and a reshoot is the right one.
Quick summary: the requirement is a plain, evenly lit, light background with no shadow. The most reliable way to get one is to stand a metre from a plain wall facing a window. Editing can rescue a decent photo; it cannot rescue a bad one.
Working from a photo you already have? Put it on a clean white background — the free preview runs in your browser, so a sensitive photo of your face is not uploaded anywhere while you check the result.
An honest word about the rules first
Passport photo requirements are set by each country’s issuing authority and they change. Two things are true almost everywhere:
- The background must be plain, uniform, light and free of shadow.
- The photograph must not be digitally altered in a way that changes your appearance.
Where authorities differ is how they treat background editing specifically. Some accept a photo whose background was replaced, as long as the person is unretouched. Others state that the image must not be digitally manipulated at all, and biometric checks can sometimes detect a replaced background by its unnaturally clean edge.
The practical advice: check your country’s official guidance before you rely on editing, and where you can, reshoot instead. It takes five minutes and removes all doubt. Use editing to correct a background that is nearly right — an uneven tone, a slight colour cast — rather than to invent one that was never there.
What four issuing authorities actually say
Below is what four authorities say, in their own words, about the two things this guide is about: the colour behind you, and whether you may change it in software. Every line is quoted from the authority’s own published guidance, and the sources are listed underneath.
| Where | The background it asks for | What it says about editing |
|---|---|---|
| UK | “a plain light-coloured background” | “unaltered by computer software” — a blanket rule. The background is not named. |
| US | “a plain, white, off-white, or light-colored background” | “Digital manipulation and/or retouching of the facial image on photographs is not acceptable.” The rule names the face. The background is not mentioned. |
| EU / Schengen visa | “be taken with a plain light-coloured background” | Nothing at all. The EU photo guidelines do not mention editing, retouching or software anywhere. |
| India | “Background of the photograph should be White.” | “Photos should be unaltered by computer software.” A blanket rule. The background is not named. |
Read that last column again, because it is the honest answer to the question everybody asks. Not one of these four authorities says you may replace a background in software. Not one of them says you may not, either — not in those words. The UK and India ban alteration in general terms and leave you to work out whether a new background counts as alteration. The US rule is written about the face. The EU guidance says nothing.
That is a gap rather than a loophole, and the cost of a gap lands on you: a rejected application means the fee and the wait again. So the advice in this guide stands, and this table is the reason for it. Edit a background that is nearly right. Reshoot one that is not.
One more thing worth taking from the table: “light” is not the same as “white”. For its own passport and identity card, France requires a plain light background and forbids white outright — “Le fond blanc est interdit.” So “white is always safe in Europe” is simply wrong. Check the country you are applying to, every time.
Sources. UK: gov.uk photos for passports. US: the State Department’s Foreign Affairs Manual, 8 FAM 402.1 — also read the travel.state.gov photo page before you submit. EU / Schengen: the European Commission’s ICAO photograph guidelines, linked from its Schengen visa page. India: Passport Seva’s ICAO-compliant photograph guidelines and the application instruction booklet. France: service-public.gouv.fr.
Two gaps we will not paper over. Individual Schengen states publish their own visa photo sheets, and we could not read the French and German ones, so treat the EU row as the pan-European floor rather than the last word for the country you are applying to. And the French rule quoted above is for the French passport and identity card, not for a Schengen visa — it is here to show that “light” and “white” differ, not as a visa rule.
The other requirements, in general terms
These are common patterns across authorities, not a substitute for the official guidance for your country.
| Requirement | Typical rule |
|---|---|
| Background colour | Plain white, off-white, cream or light grey |
| Uniformity | Even tone, no gradient, no pattern, no texture |
| Shadows | None on the face or the background |
| Objects | Nothing visible behind you — no furniture, doors, plugs |
| Contrast | Background must differ clearly from hair and clothing |
| Head position | Facing forward, neutral expression, eyes open |
| Head size | A set proportion of the frame — country-specific |
Two of these matter for the background job specifically. Contrast catches people out: white hair against a white wall, or a white shirt merging into the background, can both fail even though the wall itself is correct. And uniformity is the one indoor lighting quietly breaks — a wall lit from one side has a gradient across it that your eye ignores and a checking system does not.
The reliable way: shoot it properly
Five minutes and no editing needed.
- Find a plain wall. No skirting board in frame, no light switch, no textured wallpaper. A plain door often works if the wall does not.
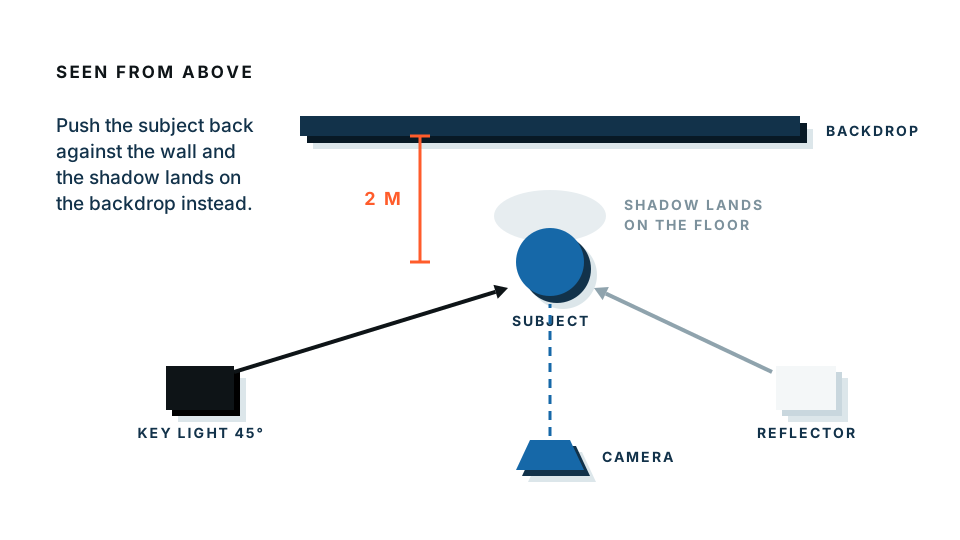
- Stand a metre away from it. This is the single most important step. Distance is what stops your shadow landing on the wall.
- Face a window. Daylight from the front, on an overcast day if possible. Turn off the ceiling light — mixing daylight and bulb light creates a colour cast.
- Have someone else take it. Arm’s length selfies distort facial proportions and are commonly rejected. Ask someone to stand about 1.5 to 2 metres away and zoom in slightly.
- Camera at eye level. Not tilted up or down.
- Neutral expression, eyes open, mouth closed. No glasses if your country’s rules exclude them, which many now do.
- Take several. Blinks are inevitable.
Fixing the background you already have
If reshooting is not possible — you are abroad, the photo is of a child who will not cooperate again, the moment has passed — here is how to clean up what you have.
Step 1: assess whether it is fixable
Editing can fix: an uneven wall tone, a mild colour cast, a slightly wrong background colour, a small object in the corner.
Editing cannot fix: motion blur, a wrong camera angle, closed eyes, a shadow across the face, or a background so close in tone to your hair that no edge exists.
If the problem is in the second list, do not spend time on it. It will be rejected for that reason regardless of the background.
Step 2: replace the background with plain white
- Open the white background maker.
- Drop your photo in. Your subject is separated from the background automatically.
- Choose a plain white or very light grey background.
- Check the preview carefully — see the checklist below.
- Download at full resolution.
The free preview happens entirely inside your browser. For a passport photo that matters more than for most images: you are handling a picture of your face that is about to be attached to an identity document. Nothing is uploaded while you preview. If you buy the full-resolution download, that single file is processed on our server — we would rather state that than let you assume it is local end to end.
Step 3: check the edge like an inspector would
Zoom to 100% and look at:
- Hair. The most common giveaway. Individual strands should fade naturally, not stop at a hard line. A cutout that looks like a paper silhouette will be spotted.
- Shoulders and collar. Dark clothing against white shows fringing clearly.
- Ears and glasses arms. Thin details that automatic tools sometimes trim.
- Between arm and body. Any gap should be background, not filled.
- The overall tone. Pure white can blow out light-coloured hair. A very light grey often reads better and still meets “plain white or off-white” requirements in most guidance.
Step 4: size and export it correctly
Common specifications, as a starting point only — verify against your country’s rules:
| Region | Print size | Typical digital requirement |
|---|---|---|
| UK | 45 x 35 mm | At least 600 x 750 px, under 10 MB |
| US | 2 x 2 inches | 600 x 600 to 1200 x 1200 px, square |
| Schengen | 45 x 35 mm | Varies by country |
Export as JPG for most online applications — passport systems generally want JPG, and there is no transparency to preserve once the background is white. Do not over-compress; artefacts around the head can fail an automated check.
Ready to clean up the background? Open the white background maker and check the edges before you commit to anything.
Common rejection reasons and their real cause
“Shadow on the background.” You stood too close to the wall. No amount of brightening fixes a shadow with a hard edge — reshoot with a metre of space.
“Background not uniform.” The wall was lit from one side, or it has subtle texture. Replacing with flat white solves this cleanly.
“Insufficient contrast between subject and background.” Light hair or light clothing on white. Try a light grey background instead of pure white.
“Photo appears digitally altered.” Often a too-perfect cutout edge, or visible retouching of the skin. Keep the person completely untouched, and prefer a reshoot.
“Face not centred / wrong head size.” Nothing to do with the background. Recrop to the required proportions, or reshoot.
“Red eye or reflection in glasses.” Reshoot without flash, or without glasses if permitted.
Photos of babies and small children
Different problem, same principles. Most authorities relax the expression and eye rules for infants but keep the background rules.
The trick that works: lay the baby on a plain white sheet on the floor and photograph directly down from above, with daylight from a window. There is no shadow because there is no wall, and the sheet gives you a uniform light background naturally. Keep hands and toys out of frame.
The one-page checklist
- Plain, light, uniform wall — no pattern, no objects.
- A metre of space between you and it.
- Daylight from the front, ceiling lights off.
- Someone else takes it, from about two metres, at eye level.
- Neutral expression, eyes open, hair off the face.
- Check the official requirements for your country before submitting.
- If editing, fix the background only — never the person.
Clean up your background if the photo is nearly right. If it is not nearly right, five minutes against a plain wall will beat any edit you can make.
Frequently asked
What background colour does a passport photo need?
It depends on the country, and the exact wording matters. The UK asks for a plain light-coloured background. The EU's Schengen photo guidance asks for the same. The United States accepts plain white, off-white or light. India requires white. France forbids a white background outright for its own passport and identity card. So check the authority you are applying to rather than assuming white is always safe.
Is it allowed to edit the background of a passport photo?
No authority we checked says so in as many words. The UK and India ban alteration by computer software in general terms, without naming the background. The United States rule is written about the facial image rather than the background. The EU guidance does not mention editing at all. That is a gap rather than a permission, and the cost of a rejected application falls on you — so reshoot against a plain wall where you can, and use editing only to correct a background that is nearly right.
Why does my passport photo get rejected for the background?
The usual causes are a shadow behind the head, an uneven or patterned wall, a background too close in tone to hair or clothing, or a colour cast from indoor lighting.
How do I avoid a shadow behind my head?
Stand at least a metre away from the wall and face a window. Distance from the wall is what removes the shadow — no lighting trick fixes standing right against it.
Is it safe to upload my passport photo to a website?
It is a sensitive image, so be careful. Our free preview runs entirely inside your browser, which means the photo is never uploaded to us while you are working on it.