White backgrounds
How to Remove White Background From Image Online
Get rid of the white box behind your logo or product shot online, and save it as a PNG so it sits on any colour without a rectangle around it.
You have a logo, a product shot, a scanned drawing or a bit of clipart. It looks fine on a white page. The moment you put it on a coloured slide or a dark website header, it arrives wearing an ugly white rectangle.
This guide fixes that, explains exactly why it happens, and covers the two problems that catch people out afterwards: white subjects on white backgrounds, and the halo of leftover pixels around the edge.
Quick summary: the white box is a file format problem. JPG cannot store transparency, so remove the white and save as PNG. Then check the result on a dark colour before you use it anywhere.
Start here if you just want it gone: our transparent background maker strips the white and gives you a PNG.
Why is there a white box behind my image?
This is the bit worth understanding, because once you get it the rest is obvious.
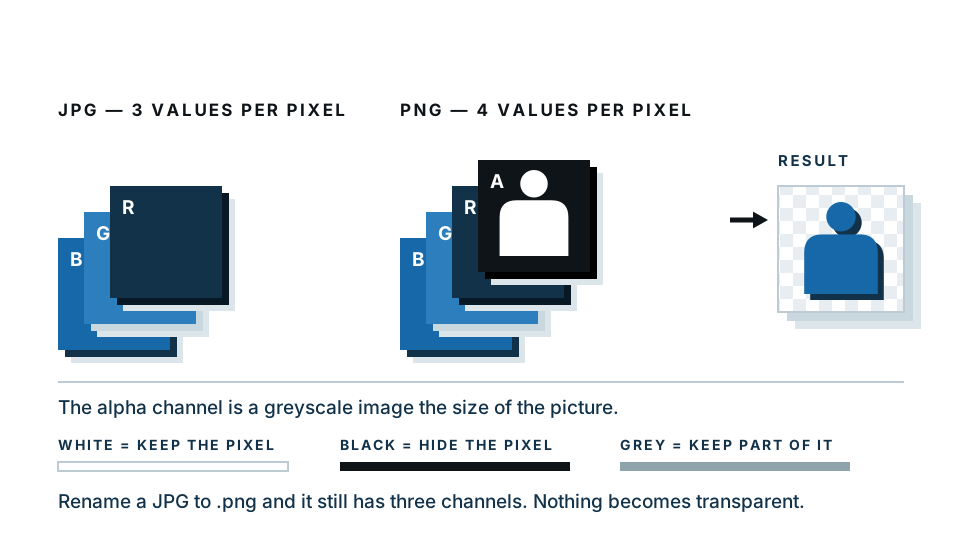
A JPG stores a colour for every single pixel. Red, green and blue values — that is all it has room for. There is no way to record “this pixel is nothing”. Transparency simply does not exist in the format.
So when a program saves an image with an empty background to JPG, it has to put something in every pixel. It puts white. Your transparency is gone, permanently, the moment the file is written.
PNG and WebP are different. They carry an extra piece of information per pixel called the alpha channel — a fourth value alongside red, green and blue, recording how see-through that pixel is. Zero means fully invisible, maximum means fully solid, and everything between gives you soft, partly transparent edges. That is what lets a logo sit cleanly on any colour.
Which file format should you use?
| Format | Transparency | File size | Best for |
|---|---|---|---|
| JPG | None at all | Smallest for photos | Photographs that fill the whole frame, where nothing needs to be see-through |
| PNG | Full alpha channel | Larger, especially for photos | Logos, cutouts, screenshots, anything that must sit on a coloured background |
| WebP | Full alpha channel | Roughly 25–35% smaller than PNG | Websites — same transparency as PNG with less weight. Supported by all current browsers |
| SVG | Transparent by nature | Tiny, for suitable artwork | Vector logos and icons only. Scales to any size perfectly, but cannot hold a photograph |
The short version: if it needs to be see-through, use PNG. If it is for the web and you can, use WebP. If it is a vector logo and you have the original file, use SVG.
How to remove a white background online: the steps
- Find the highest-quality version you have. The original beats a screenshot of it. Repeatedly re-saved JPGs pick up fuzzy blocks around edges, and those blocks become fuzzy cutouts.
- Open the white background maker and drop your image in.
- Let the automatic cutout run. It finds the subject and removes what is around it. On a clean logo or product shot this takes seconds.
- Look at the result on a dark colour, not white. This is the step people skip. Against white, a bad cutout looks perfect. Against black, every leftover pixel shows.
- Check the enclosed gaps. The hole in a letter O, the space inside a mug handle, the gap between an arm and a body. These are the areas tools most often leave filled.
- Download as PNG — or WebP if it is going on a website and file size matters.
- Do not re-save it as a JPG afterwards. Not when you compress it, not when you resize it, not when a tool offers to “optimise” it. That one step undoes everything.
The white-on-white problem
Here is the honest limitation nobody mentions until you hit it.
A white mug on a white sweep. A white t-shirt on a white backdrop. A white sneaker in a white lightbox. These are genuinely hard, and not because the tool is bad — because there is almost nothing there to find.
Removing a background means deciding, for every pixel, whether it belongs to the subject. That decision needs a difference between the two. When your subject and background are both near-white, the pixels either side of the edge might differ by two or three shades. There is barely an edge at all.
What actually happens: the tool eats into the white parts of your product, or leaves lumps of background attached, or produces a wobbly outline that follows the shadow instead of the object.
What to do about it
- Reshoot on mid-grey if you can. By far the best fix, and it takes minutes. A neutral grey sweep gives a clear edge, and you can still get a pure white final background afterwards. Studios shoot white products on grey for exactly this reason.
- Light the edges. A rim of light down each side of a white product separates it from the backdrop. Even a strip of card reflecting light from behind helps.
- Accept a touch-up. For a one-off, keep what the tool gets right and fix the ambiguous edge by hand.
- Watch the shadow. A soft shadow under a white product is often the only visible edge, and tools frequently keep it as part of the subject. Decide whether you want it, and be consistent across a product range.
The same applies in reverse: a black subject on black, or a beige product on cream. Low contrast is the problem, not the colour.
The halo problem, and how to fix it
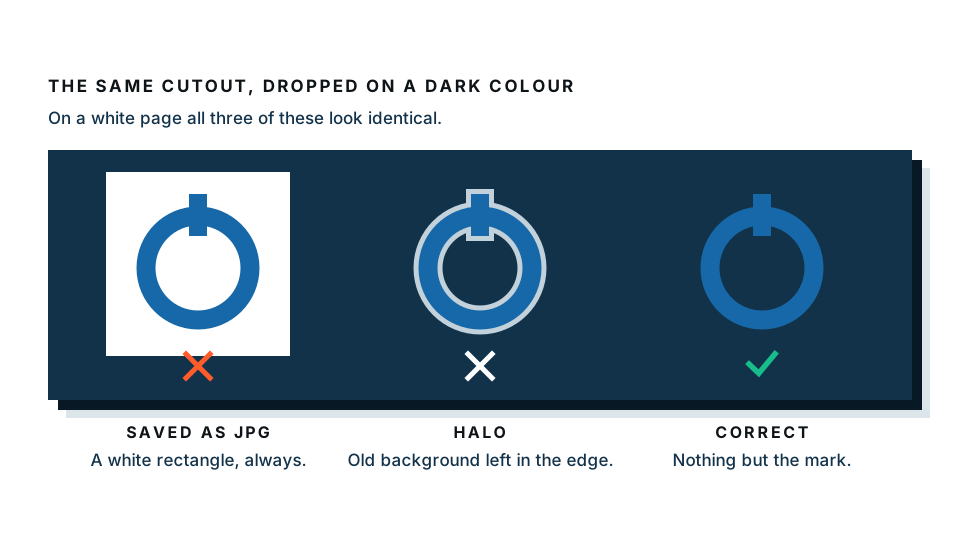
Every cutout from a white background carries a risk of a halo — also called a fringe or a matte line. It is a thin rim of pale pixels left over from the old background, one or two pixels wide, following the outline of your subject.
It happens because edge pixels are mixtures. A pixel sitting exactly on the boundary of a dark logo against white is not black and not white — it is grey, a blend of both. When the white is removed, that blend stays behind, and it is much lighter than your subject.
How to spot it
Put the cutout on a solid black background and zoom in to 100 percent. If you see a pale outline tracing the shape, that is your halo. On white you will never see it, which is why so many logos ship with one.
How to reduce it
- Contract the cutout by a pixel. Pulling the edge in by one pixel removes the contaminated ring. This is the standard fix and it works for most images.
- Feather slightly after contracting, so the tighter edge does not look jagged.
- Start from a bigger image. A 2000-pixel-wide logo has proportionally less edge contamination than a 300-pixel one, and shrinking afterwards hides what remains.
- Avoid re-compressing before cutting. JPG compression spreads edge colours into neighbouring pixels, widening the contaminated band before you start.
If your logo has a hard, clean edge, the contract-by-one trick usually removes the halo entirely. Soft edges — hair, fur, feathered brush strokes — are harder, because the soft edge and the halo are made of the same kind of pixel.
Working with something confidential?
If it is an unreleased product, a client’s artwork, or a scanned document, note that our free preview runs entirely in your browser. The image is never uploaded. The paid full-resolution download is processed on our server, so choose whichever fits what you are working on.
Quick checklist before you use the file
- Opens with a checkerboard pattern, not a white square — the checkerboard is how editors draw “nothing here”
- Filename ends in
.pngor.webp, not.jpg - Looks clean when placed on black
- Enclosed gaps are actually see-through
- Big enough for where it is going — you cannot enlarge a cutout without it going soft
Got a white box to get rid of? Drop the file into our white background maker and download it as a PNG.
Frequently asked
Why does my logo still have a white box around it?
Because it is saved as a JPG. The JPG format cannot store transparency at all — every pixel must have a colour, so anything with no background gets filled with white. Re-save it as a PNG and the box disappears.
Can you remove a white background from a JPG?
Yes, but you cannot save the result as a JPG. Remove the white, then export as PNG or WebP. Saving back to JPG will fill the transparent area with white again and undo the whole job.
Why is my white product hard to cut out?
A white mug on a white background has almost no edge for any tool to detect — the pixels either side of the boundary are nearly identical. Expect to touch it up by hand, or reshoot on a mid-grey background where the edge is obvious.
What is a halo on a cutout image?
A thin rim of leftover light pixels from the old white background, clinging to your subject's edge. It is invisible on a white page and obvious on a dark one. Place your cutout on black to check for it.
Is PNG or SVG better for a logo with no background?
SVG if you have it — it scales to any size with no quality loss and usually has the smallest file. But SVG only works for vector artwork, so a photo or a scanned drawing has to be a PNG.