White backgrounds
The Easiest Way to Add a Solid White Background to a Photo
Put any photo on a clean solid white background in under a minute, plus the edge and shadow details that separate a pro result from an obvious cutout.
A white background does two jobs at once. It makes a product look professional, and it makes a grid of products look like they belong to the same shop. Both matter more than the photo itself.
The good news is that this is now a one-minute job rather than a retouching skill. The details below are what separate a result that looks shot in a studio from one that looks obviously cut out.
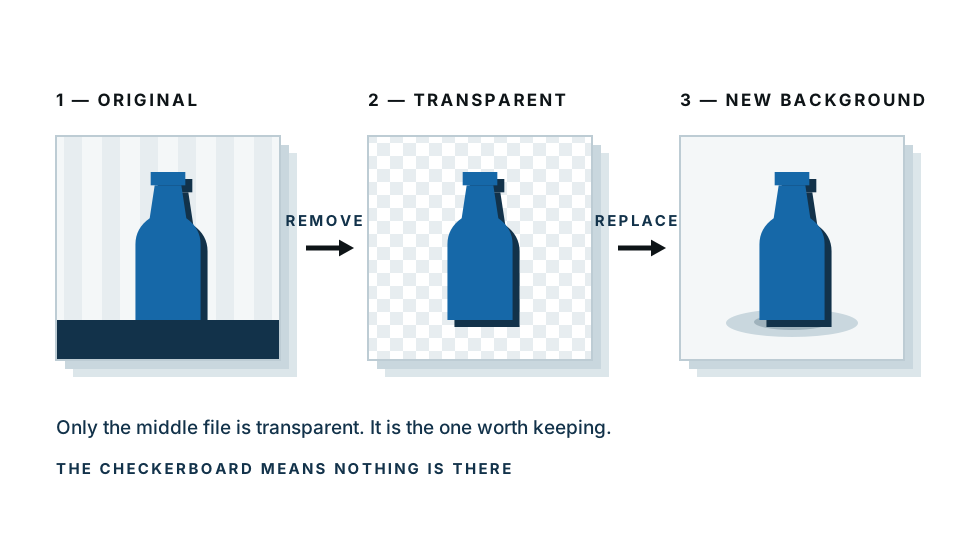
Quick summary: remove the existing background, apply white behind the subject, add a soft contact shadow, and export as JPG at your platform’s required size.
Have the photo open? Add a white background now — the free preview runs entirely inside your browser, so nothing is uploaded while you check the result.
The fast method: automatic
- Open the white background maker.
- Drag your photo in, or click to choose a file.
- Your subject is separated from its background automatically.
- Choose white as the new background.
- Check the preview at full zoom — see the checklist below.
- Download.
That is the whole thing. It takes about as long as reading the steps.
What to check before downloading
The edges. Zoom to 100% and look at where the subject meets the white. You are looking for a clean transition, not a hard cut and not a fringe of the old background colour.
Thin details. Straps, handles, wires, stems, hair. Automatic detection can trim these. If something important vanished, note it and fix it in a touch-up pass.
Enclosed gaps. The space inside a mug handle, between an arm and a body, through the hole in a pair of scissors. These should be white, not filled with the old background.
Shadow. Did the original shadow come with the subject, or get removed? Either can be right — see below.
The detail everyone gets wrong: the contact shadow
A product on pure white with no shadow looks like a sticker. Your eye expects an object resting on a surface to have a soft dark area directly beneath it, and its absence reads as wrong even when people cannot say why.
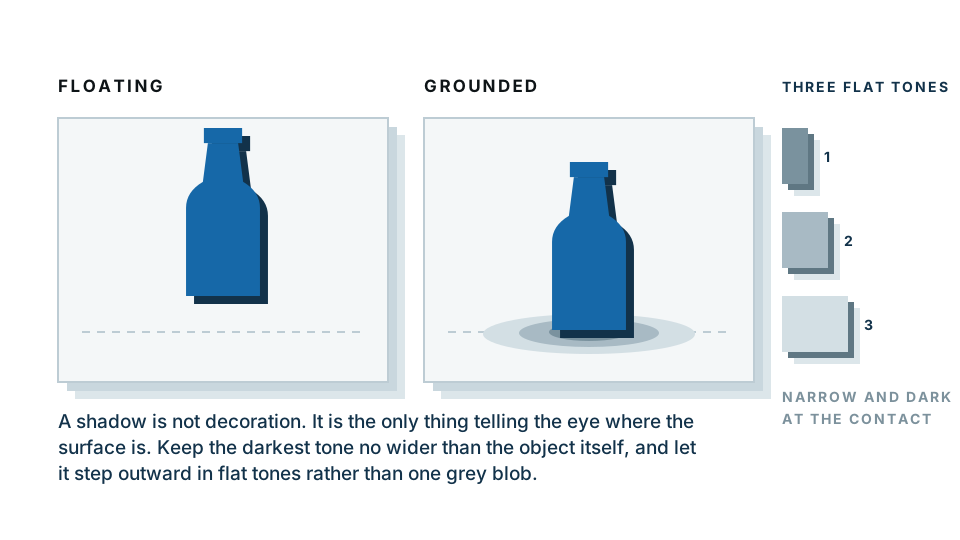
Three ways to handle it, in order of effort:
Keep the original. If the original photo had a soft shadow on a light surface, keeping it is the easiest route and always looks natural.
Add a simple one. In any editor, draw a soft-edged dark ellipse under the product, set the layer to Multiply, and reduce opacity to around 20 to 30 percent. Darkest where the object touches, fading outward.
Skip it deliberately. For a floating or hanging item — jewellery on a chain, a garment on an invisible mannequin — no shadow is correct. Consistency across your set matters more than the rule.
The one rule: whatever you choose, do it the same way for every product in your range. A grid where half the items have shadows and half do not looks careless.
Should the white be pure white?
Pure white is RGB 255, 255, 255 — the brightest a screen can display.
Use pure white when: you are uploading to a marketplace that requires it. Most major platforms specify pure white for the main listing image, and automated checks will reject anything else.
Consider slightly off-white when: the image lives on your own site, and your products are light-coloured. A white ceramic mug on pure white loses its edges entirely. A background of around RGB 248, 248, 248 keeps the clean look while letting light products stay visible.
Never use: a white with a colour cast. If you sampled the white from your original photo it may be slightly blue or yellow. Set it deliberately rather than sampling it.
Halfway through and the edges are not right? Try the automatic version and compare — the preview costs nothing and takes seconds.
Doing it manually, if you prefer
In Photoshop
- Open the image and unlock the Background layer by clicking the padlock.
- Choose Select → Subject, then Select → Inverse.
- Press Delete to remove the background.
- Create a new layer, fill it with white (Edit → Fill → White), and drag it below your subject layer.
- To refine, select your subject layer, click Select and Mask, and use the Refine Edge Brush around hair.
- File → Export → Export As, choose JPG.
In GIMP
- Layer → Transparency → Add Alpha Channel.
- Use Fuzzy Select on the background, or draw a path around the subject and invert the selection.
- Select → Shrink by 1 pixel, Select → Feather by 1 pixel, then Delete.
- Layer → New Layer, fill with white, move it to the bottom of the layer stack.
- Image → Flatten Image, then File → Export As with a .jpg extension.
In Canva
- Upload your photo and place it on a blank white design.
- Select the image and click Edit photo → Background Remover (this is a Pro feature).
- Resize and position the cutout on the white canvas.
- Download as JPG.
What size should you export?
This depends entirely on where the image is going. Common requirements:
| Destination | Recommended size | Format |
|---|---|---|
| Amazon main image | 1600 px longest side minimum, 3000 preferred | JPG |
| Etsy listing | 2000 x 2000 px | JPG |
| eBay | 1600 px longest side | JPG |
| Shopify | 2048 x 2048 px | JPG or WebP |
| Own website | 1200–2000 px, compressed | WebP or JPG |
Two rules that hold everywhere. Do not upscale — enlarging a small photo adds pixels but no detail, and the softness shows. Do not over-compress — heavy JPG compression creates visible blocky artefacts around a subject’s edge, which is exactly where people look.
Batch consistency for a product range
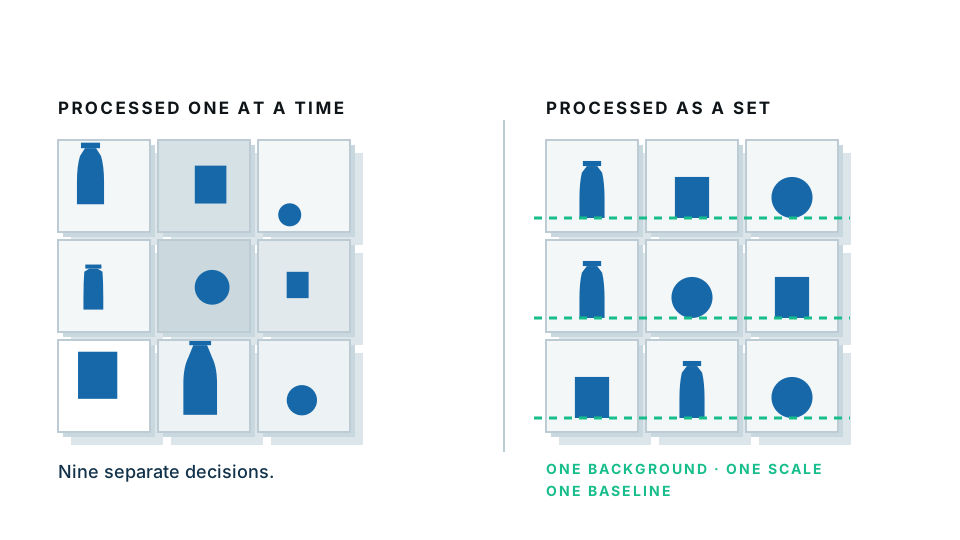
If you are doing more than five images, plan the set rather than doing them one at a time.
- Decide the rules once. Background white value, canvas size, how much margin around the product, shadow style.
- Use the same margin. Products should occupy roughly the same proportion of the frame — typically 80 to 90 percent of the shorter dimension.
- Match the vertical position. Products sitting at different heights in the frame makes a grid look chaotic.
- Process them the same way. Same tool, same settings, same order.
- Review as a grid, not individually. Put all the thumbnails side by side. Inconsistencies that are invisible one at a time jump out immediately.
Common problems
A grey or coloured halo around the subject. The old background survived in the edge pixels. Shrink the selection by a pixel before filling, or use a tool that handles edge fade properly.
Light parts of the product disappeared. They matched the white and were removed with the background. Use a slightly off-white, or fix that area manually.
The white is not actually white. Check with a colour picker. If it reads 251, 249, 245 rather than 255, 255, 255, a marketplace check may reject it.
The image looks flat and lifeless. Pure white removes all context. Add a subtle shadow, and make sure the product itself still has its own light and shade — a product lit flat on a white background has nothing to look at.
The subject looks pasted at the wrong scale. Compare against your other listings. Consistent scale across a range does more for perceived quality than any single image.
Keep your master file
Once you have a good cutout, save a transparent PNG as your master before flattening to white JPG. That transparent version is reusable — you can put it on white today, on a lifestyle background next month, and on a seasonal banner in November, without redoing the cutout.
This one habit saves more time than any other tip here.
Make your white background version now — free preview, processed on your own device, and you will have a listing-ready image in under a minute.
Frequently asked
What is the fastest way to put a photo on a white background?
Use an automatic white background maker. Drop the image in, the subject is separated from its background, and white is applied behind it. It takes a few seconds and needs no editing skills.
Should the white be pure white?
For marketplace listings, yes — most require pure white, RGB 255,255,255. For your own site, a very slightly off-white often looks better because pure white can make light-coloured products disappear.
Why does my product look like it is floating?
The contact shadow was removed with the background. Add a soft shadow directly beneath the product where it would touch the surface. It takes seconds and fixes the effect completely.
Should I save as JPG or PNG?
JPG, once the background is solid white — there is no transparency to preserve and the file will be smaller. Keep a transparent PNG as your master in case you need a different background later.
Is a white background required for online marketplaces?
Most require pure white for the main listing image. Secondary images usually allow lifestyle backgrounds. Check the current policy for your platform before uploading.