Logos & graphics
How to Remove the Background from a Logo
Get a clean transparent logo from a JPG, screenshot or scan, with steps for the fast automatic route and the manual route for sharp-edged logos.
You have the logo as a JPG. It has a white square around it. You need it on a coloured header, a t-shirt mockup, or a slide, and the white box makes it look broken.
This is a five-minute fix. Here is the fast way, the careful way, and the thing you should do afterwards so you never have to do this again.
Make your logo transparent now →
Why does a logo need a transparent background?
A logo with a background is a picture of a logo. A logo with transparency is a logo.
Practically, transparency means:
- It sits on any colour without a visible box.
- It works on photographs, in headers, over video.
- It can be placed on merchandise mockups and printed materials.
- It looks professional rather than pasted.
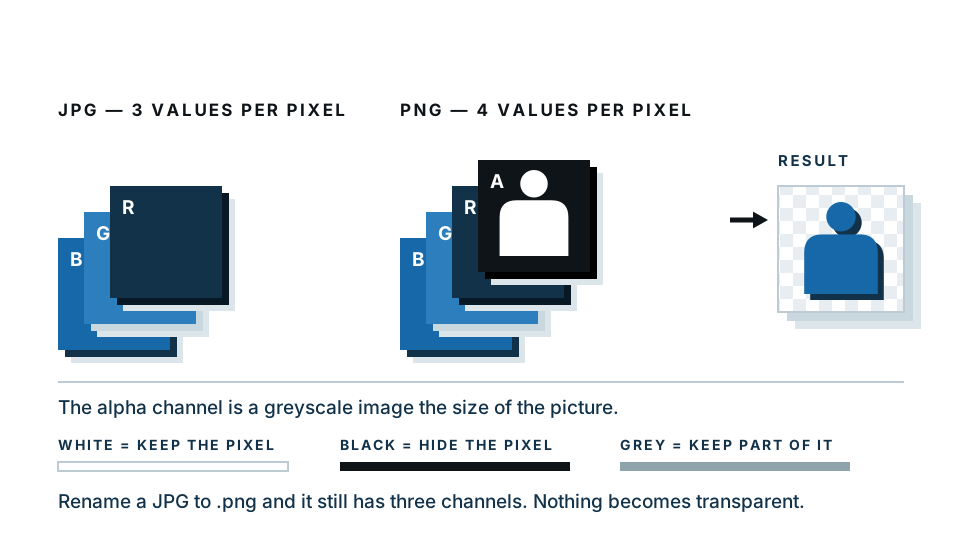
The technical reason the box exists: JPG files have no transparency channel. Every pixel must have a colour, so “nothing” gets stored as white. PNG files have an alpha channel — a fourth value per pixel recording how transparent it is — which is why PNG is the answer.
Method 1: the fast automatic route
Best for logos with clean shapes, and for anyone who needs this done in the next two minutes.
- Open the transparent background maker.
- Drop your logo file in. JPG, PNG, screenshot — anything.
- Wait a second. The background is detected and removed automatically.
- Check the result against both a white and a dark preview. Logos often look fine on white and reveal a halo on black.
- Refine if needed. If a counter — the enclosed space in a letter O or A — was left filled, brush it out.
- Download as PNG.
Our free preview runs entirely inside your browser. The logo file is never uploaded, which matters if you are working on branding that has not been announced.
What to check before you use it anywhere
Place the downloaded PNG on a black background and zoom in.
- A pale halo? The cut was slightly loose and kept a rim of white. Redo it or tighten the edge with the brush.
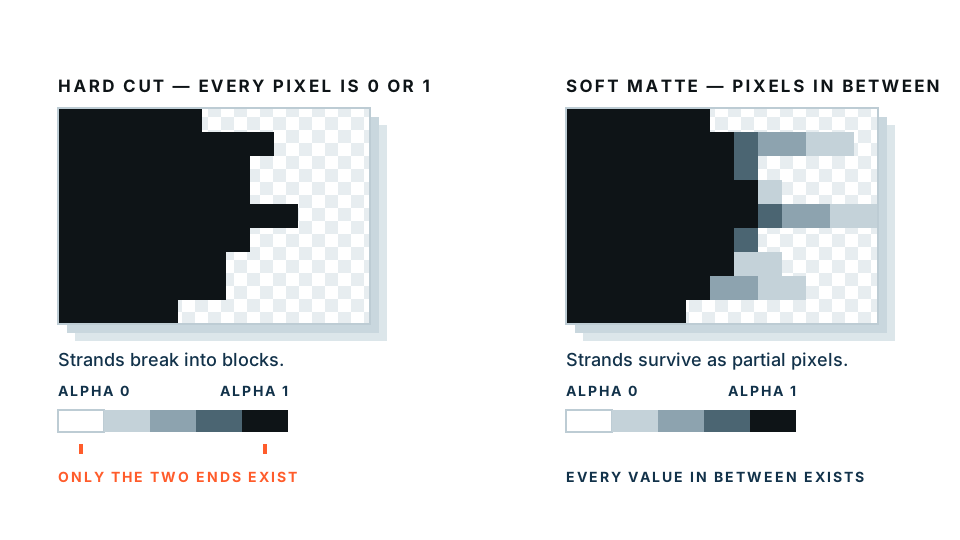
- Jagged, stair-stepped edges? The source was probably a low-resolution screenshot. Get the original file.
- Filled-in letter holes? The insides of O, A, P, R and similar. Brush them out.
- Faded thin lines? Hairline strokes can get partly cut away. This is where the manual method wins.
Method 2: the manual route for sharp-edged logos
Automatic tools are trained mostly on photographs. A logo is a very different thing — flat colours, hard edges, mathematically precise curves. For a logo that is one solid colour on one solid background, a colour-based selection is often cleaner than any automatic model.
In GIMP (free)
- Open the logo. Layer → Transparency → Add Alpha Channel. Without this, “delete” fills with white instead of clearing.
- Choose the Fuzzy Select tool (magic wand).
- Set Threshold to about 20 and tick Antialiasing.
- Click the background. Hold Shift and click any other background areas, including the insides of letters.
- Press Delete. You should see the checkerboard.
- Select → Grow by 1, then Select → Feather by 1 if the edge looks harsh.
- File → Export As, filename ending in
.png.
In Photoshop
- Open the logo. Double-click the Background layer in the Layers panel to unlock it.
- Select → Color Range. Click the background colour, adjust Fuzziness until the background is selected cleanly.
- Press Delete.
- Tidy any leftovers with the eraser.
- File → Export → Export As → PNG, with Transparency ticked.
In Preview on a Mac
For a very simple logo: open the file, click the markup toolbar, choose Instant Alpha, drag across the background, press Delete. Save as PNG. Crude, but free and already installed.
Which method should I use?
| Your logo | Best method | Why |
|---|---|---|
| Photo-like, gradients, shadows | Automatic | Colour selection cannot handle gradients |
| Flat colour on flat background | Colour selection in GIMP or Photoshop | Cleaner, more precise edges |
| Complex, many colours, on white | Automatic, then brush | Fastest route to a usable result |
| Low-resolution screenshot | Automatic, then accept limits | Nothing recovers detail that was never captured |
| You have the original vector file | Neither — export from the source | Always better than any extraction |
The thing to do afterwards
Once you have one clean transparent PNG, build a small logo kit. It takes ten minutes and it removes this problem permanently.
Create a folder with:
logo-colour.png— full colour on transparency, at least 2000 px wide.logo-white.png— the same shape filled flat white, for dark backgrounds.logo-black.png— flat black, for light backgrounds and print.logo-square.png— cropped to a square with padding, for profile pictures.logo.svg— if you have vector artwork.
Making the white version: open the transparent PNG, add a solid white layer above it, and clip it to the logo’s shape. In Photoshop that is a Color Overlay layer style set to white. In GIMP, use Colors → Colorize or a white layer with Alpha to Selection.
Common problems
“The transparent PNG still shows a white box.” You are viewing it in something that renders transparency as white — some file previewers do this. Drop it onto a coloured background to check properly.
“It looks blurry when I make it bigger.” PNG is pixels. Scaling up cannot invent detail. You need the vector source, or a much larger raster export.
“The edges look crunchy on a coloured background.” The logo was extracted from a JPG, and JPG compression leaves fuzzy artefacts around hard edges. Get a PNG or vector source.
“Parts of the logo vanished.” Thin strokes or pale colours were read as background. Use the brush to paint them back in, or switch to the manual method.
Get it done
If you have the original vector file, use that and skip everything above. If you do not — and most people do not — the automatic route will have you a usable transparent PNG in under a minute.
Frequently asked
What file format should a transparent logo be?
PNG for everyday use — it supports transparency and works everywhere. SVG if you have vector artwork, because it scales to any size without blurring. Never JPG: it cannot store transparency at all.
Why does my logo have a white box around it?
It is saved as a JPG, or as a PNG that was flattened onto white. JPG has no transparency channel, so the background is baked in as real white pixels. You need to remove it and re-save as PNG.
Can I get a transparent logo from a low-resolution screenshot?
You can remove the background, but the result will still be low resolution and the edges will look soft. For a logo you will reuse, it is worth asking whoever designed it for the original file.
How do I make a logo work on both light and dark backgrounds?
Make two versions from the same transparent master — one in the original colours, one in flat white. Use the white one on dark backgrounds. Almost every brand does this.
Is it safe to upload a client's logo to an online tool?
Our free preview processes the image entirely in your browser, so the file never leaves your computer. For unreleased branding, check any tool's privacy policy before uploading.